Wednesday, October 6, 2021

Six SQL Server performance tuning tips from Pinal Dave

https://canro91.github.io/2020/09/28/SQLServerTuningTips/


Six SQL Server performance tuning tips from Pinal Dave

Recently, I’ve needed to optimize some SQL Server queries. I decided to look out there what to do to tune SQL Server and SQL queries. This is what I found.

At the database level, turn on automatic update of statistics, increase the file size autogrowth and update the compatibility level. At the table level, delete your unused indexes and create the missing ones, keeping around 5 indexes per table. And, at the query level, find and fix implicit conversions.

While looking up what I could do to tune my queries, I found Pinal Dave from SQLAuthority. Chances are you have already found one of his blog posts when searching for SQL Server tuning tips. He’s been blogging about the subject for years.

These are six tips from Pinal’s blog and online presentations I’ve applied recently. Please, test these changes in a development or staging environment before making anything on your production servers.

1. Enable automatic update of statistics

Turn on automatic update of statistics. You should turn it off if you’re updating a really long table during your work-hours.

This is how to enable automatic update of statistic update. [Source]

USE <YourDatabase>;
GO

-- Enable Auto Create of Statistics
ALTER DATABASE <YourDatabase>
SET AUTO_CREATE_STATISTICS ON WITH NO_WAIT;

-- Enable Auto Update of Statistics
ALTER DATABASE <YourDatabase>
SET AUTO_UPDATE_STATISTICS ON WITH NO_WAIT;
GO

-- Update Statistics for whole database
EXEC sp_updatestats
GO

2. Fix File Autogrowth

Add size and file growth to your database. Make it your weekly file growth. Otherwise, change it to 200 or 250MB.

From SQL Server Management Studio, to change the file autogrowth, go to your database properties and then to Files. Click on the three dots in the Autogrowth column. And, change the file growth.
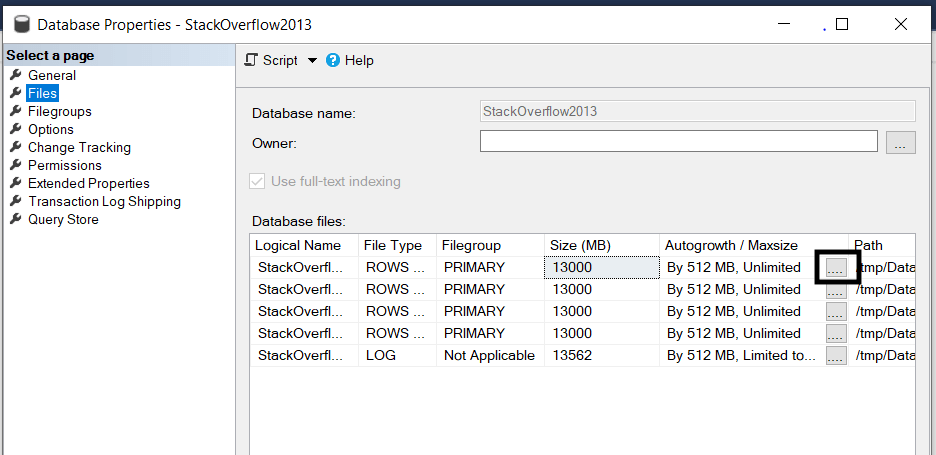
Files page from Database properties in SQL Server Management Studio

3. Find and Fix Implicit conversions

Implicit conversions happen when SQL Server needs to convert between two data types in a WHERE or in JOIN.

For example, the query below with OrderNumber as a VARCHAR(20) has implicit warning when we compare it to a INT parameter.

DECLARE @OrderNumber INT = 123;

SELECT *
FROM dbo.Orders
WHERE OrderNumber = @OrderNumber;
GO

To run this query, SQL Server has to go through all the rows in the dbo.Orders table to convert the OrderNumber from VARCHAR(20) to INT.

To decide when implicit conversion happens, you can check Microsoft Data Type Precedence table. Types with lower precedence convert to types with higher precedence. For example, VARCHAR will be always converted to INT and to NVARCHAR.

Use the below script to indentify queries with implicit conversion. [Source].

SELECT TOP(50) DB_NAME(t.[dbid]) AS [Database Name], 
t.text AS [Query Text],
qs.total_worker_time AS [Total Worker Time], 
qs.total_worker_time/qs.execution_count AS [Avg Worker Time], 
qs.max_worker_time AS [Max Worker Time], 
qs.total_elapsed_time/qs.execution_count AS [Avg Elapsed Time], 
qs.max_elapsed_time AS [Max Elapsed Time],
qs.total_logical_reads/qs.execution_count AS [Avg Logical Reads],
qs.max_logical_reads AS [Max Logical Reads], 
qs.execution_count AS [Execution Count], 
qs.creation_time AS [Creation Time],
qp.query_plan AS [Query Plan]
FROM sys.dm_exec_query_stats AS qs WITH (NOLOCK)
CROSS APPLY sys.dm_exec_sql_text(plan_handle) AS t 
CROSS APPLY sys.dm_exec_query_plan(plan_handle) AS qp 
WHERE CAST(query_plan AS NVARCHAR(MAX)) LIKE ('%CONVERT_IMPLICIT%')
 AND t.[dbid] = DB_ID()
ORDER BY qs.total_worker_time DESC OPTION (RECOMPILE);

4. Change compatibility level

After updating your SQL Server, make sure to update the compatibility level of your database to the highest level supported by the current version of your SQL Server.

You can change your SQL Server compatibility level using SQL Server Management Studio or with TSQL query. [Source].

ALTER DATABASE <YourDatabase>
SET COMPATIBILITY_LEVEL = { 150 | 140 | 130 | 120 | 110 | 100 | 90 }

5. Find and Create missing indexes

Create your missing indexes. But, don’t create them all. Create the first 10 missing indexes in your database. Stick to having around 5 indexes per table.

You can use the next script to find the missing indexes in your database. [Source]. But, don’t blindly add new indexes. Check the indexes you already have and the estimated impact of the missing indexes.

SELECT TOP 25
dm_mid.database_id AS DatabaseID,
dm_migs.avg_user_impact*(dm_migs.user_seeks+dm_migs.user_scans) Avg_Estimated_Impact,
dm_migs.last_user_seek AS Last_User_Seek,
OBJECT_NAME(dm_mid.OBJECT_ID,dm_mid.database_id) AS [TableName],
'CREATE INDEX [IX_' + OBJECT_NAME(dm_mid.OBJECT_ID,dm_mid.database_id) + '_'
+ REPLACE(REPLACE(REPLACE(ISNULL(dm_mid.equality_columns,''),', ','_'),'[',''),']','') 
+ CASE
WHEN dm_mid.equality_columns IS NOT NULL
AND dm_mid.inequality_columns IS NOT NULL THEN '_'
ELSE ''
END
+ REPLACE(REPLACE(REPLACE(ISNULL(dm_mid.inequality_columns,''),', ','_'),'[',''),']','')
+ ']'
+ ' ON ' + dm_mid.statement
+ ' (' + ISNULL (dm_mid.equality_columns,'')
+ CASE WHEN dm_mid.equality_columns IS NOT NULL AND dm_mid.inequality_columns 
IS NOT NULL THEN ',' ELSE
'' END
+ ISNULL (dm_mid.inequality_columns, '')
+ ')'
+ ISNULL (' INCLUDE (' + dm_mid.included_columns + ')', '') AS Create_Statement
FROM sys.dm_db_missing_index_groups dm_mig
INNER JOIN sys.dm_db_missing_index_group_stats dm_migs
ON dm_migs.group_handle = dm_mig.index_group_handle
INNER JOIN sys.dm_db_missing_index_details dm_mid
ON dm_mig.index_handle = dm_mid.index_handle
WHERE dm_mid.database_ID = DB_ID()
ORDER BY Avg_Estimated_Impact DESC
GO

6. Delete most of your indexes

Indexes reduce perfomance all the time. They reduce performance of inserts, updates, deletes and selects. Even if a query isn’t using an index, it reduces performance of the query.

Delete most your indexes. Identify your main table and check if it has more than 5 indexes. But, don’t create indexes on every key of a JOIN.

Also, keep in mind if you rebuild an index for a table, SQL Server will remove all plans cached related to that table.

Rebuilding your indexes is the most expensive way of updating statistics.

You can find your unused indexes with the next script. [Source]. Look for indexes with zero seeks/scans and lots of updates. They’re good candidates to drop.

SELECT TOP 25
o.name AS ObjectName
, i.name AS IndexName
, i.index_id AS IndexID
, dm_ius.user_seeks AS UserSeek
, dm_ius.user_scans AS UserScans
, dm_ius.user_lookups AS UserLookups
, dm_ius.user_updates AS UserUpdates
, p.TableRows
, 'DROP INDEX ' + QUOTENAME(i.name)
+ ' ON ' + QUOTENAME(s.name) + '.'
+ QUOTENAME(OBJECT_NAME(dm_ius.OBJECT_ID)) AS 'drop statement'
FROM sys.dm_db_index_usage_stats dm_ius
INNER JOIN sys.indexes i ON i.index_id = dm_ius.index_id 
AND dm_ius.OBJECT_ID = i.OBJECT_ID
INNER JOIN sys.objects o ON dm_ius.OBJECT_ID = o.OBJECT_ID
INNER JOIN sys.schemas s ON o.schema_id = s.schema_id
INNER JOIN (SELECT SUM(p.rows) TableRows, p.index_id, p.OBJECT_ID
FROM sys.partitions p GROUP BY p.index_id, p.OBJECT_ID) p
ON p.index_id = dm_ius.index_id AND dm_ius.OBJECT_ID = p.OBJECT_ID
WHERE OBJECTPROPERTY(dm_ius.OBJECT_ID,'IsUserTable') = 1
AND dm_ius.database_id = DB_ID()
AND i.type_desc = 'nonclustered'
AND i.is_primary_key = 0
AND i.is_unique_constraint = 0
ORDER BY (dm_ius.user_seeks + dm_ius.user_scans + dm_ius.user_lookups) ASC
GO

Voilà! These are six tips I learned from Pinal Dave to start tuning your SQL Server. Pay attention to your implicit conversions. You can get a surprise.

I gained a lot of improvement only by fixing implicit conversions. In a store procedure, we had a NVARCHAR parameter to compare it with a VARCHAR column. Yes, implicit conversions happen between VARCHAR and NVARCHAR.

For more SQL content, check my posts on how to write dynamic SQL queries and the differences between TRUNCATE and DELETE.

Happy SQL time!

Tuesday, October 5, 2021

extended event

 SELECT [n].[value] ('(@name)[1]', 'varchar(50)') AS [event_name]

      ,[n].[value] ('(data[@name="batch_text"]/value)[1]', 'nvarchar(max)') AS batch_text 

       ,[n].[value] ('(action[@name="database_name"]/value)[1]', 'nvarchar(128)') AS [database_name]

      ,[n].[value] ('(@package)[1]', 'varchar(50)') AS [package_name]

      ,[n].[value] ('(@timestamp)[1]', 'datetime2') AS [utc_timestamp]

      ,[n].[value] ('(data[@name="duration"]/value)[1]', 'BIGINT') AS [duration]

      ,[n].[value] ('(data[@name="cpu_time"]/value)[1]', 'BIGINT') AS [cpu]

      ,[n].[value] ('(data[@name="physical_reads"]/value)[1]', 'BIGINT') AS [physical_reads]

      ,[n].[value] ('(data[@name="logical_reads"]/value)[1]', 'BIGINT') AS [logical_reads]

      ,[n].[value] ('(data[@name="writes"]/value)[1]', 'BIGINT') AS [writes]

      ,[n].[value] ('(data[@name="row_count"]/value)[1]', 'BIGINT') AS [row_count]

      ,[n].[value] ('(data[@name="last_row_count"]/value)[1]', 'BIGINT') AS [last_row_count]

      ,[n].[value] ('(data[@name="line_number"]/value)[1]', 'BIGINT') AS [line_number]

      ,[n].[value] ('(data[@name="offset"]/value)[1]', 'BIGINT') AS [offset]

      ,[n].[value] ('(data[@name="offset_end"]/value)[1]', 'BIGINT') AS [offset_end]

      ,[n].[value] ('(data[@name="statement"]/value)[1]', 'nvarchar(max)') AS [statement]


      ,[n].[value] ('(action[@name="database_name"]/value)[1]', 'nvarchar(128)') AS [database_name]

    FROM

       (

           SELECT CAST([fn_xe_file_target_read_file].[event_data] AS XML) AS [event_data]

               FROM [sys].fn_xe_file_target_read_file ('D:\Extended Event File Logs\*.xel', NULL, NULL, NULL)

       ) [ed]

        CROSS APPLY [ed].[event_data].nodes ('event') AS [q]([n])

WHERE [n].[value] ('(@timestamp)[1]', 'datetime2') > DATEADD(day, -1, GETDATE())

AND [n].[value] ('(@name)[1]', 'varchar(50)') = 'sql_batch_completed'

AND (

[n].[value] ('(data[@name="batch_text"]/value)[1]', 'nvarchar(max)') LIKE 'select Temp5.ChildLocationId%' --OR

--[n].[value] ('(data[@name="batch_text"]/value)[1]', 'nvarchar(max)') LIKE 'FLSP_CHILDLOCATION_DASHBOARD_DYMAMIC%' or

--[n].[value] ('(data[@name="batch_text"]/value)[1]', 'nvarchar(max)') LIKE 'SELECT DISTINCT%'

)

ORDER BY utc_timestamp desc

Monday, April 27, 2020

AD user account status

Code to AD properties

value is the addition of codes

reference: 
http://medgarnet.blogspot.com/2010/05/ad-useraccountcontrol-values.html
https://support.microsoft.com/en-us/help/305144/how-to-use-useraccountcontrol-to-manipulate-user-account-properties
http://ananthdeodhar.com/php-active-directory-integration-get-useraccountcontrol-attributes/

512 - Enable Account
514 - Disable account (512 + 2)
544 - Account Enabled - Require user to change password at first logon (512 + 32)
4096 - Workstation/server
66048 - Enabled, password never expires (512 + 65536)
66050 - Disabled, password never expires (512 + 2 + 65536)
66080 - Enabled, DONT_EXPIRE_PASSWORD - PASSWD_NOTREQD 
262656 - Smart Card Logon Required
532480 - Domain controller


1 - script
2 - accountdisable
8 - homedir_required
16 - lockout
32 - password_not_reqd
64 - password_cant_change
128 - encrypted_text_pwd_allowed
256 - temp_duplicate_account
512 - normal_account
2048 - interdomain_trust_account
4096 - workstation_trust_account
8192 - server_trust_account
65536 - dont_expire_password
131072 - mns_logon_account
262144 - smartcard_required
524288 - trusted_for_delegation
1048576 - not_delegated
2097152 - use_des_key_only
4194304 - dont_req_preauth
8388608 - password_expired
16777216 - trusted_to_auth_for_delegation

SCRIPT
0x0001
1
ACCOUNTDISABLE
0x0002
2
HOMEDIR_REQUIRED
0x0008
8
LOCKOUT
0x0010
16
PASSWD_NOTREQD
0x0020
32
PASSWD_CANT_CHANGE
0x0040
64
Note You cannot assign this permission by directly modifying the UserAccountControl attribute. For information about how to set the permission programmatically, see the "Property flag descriptions" section.
ENCRYPTED_TEXT_PWD_ALLOWED
0x0080
128
TEMP_DUPLICATE_ACCOUNT
0x0100
256
NORMAL_ACCOUNT
0x0200
512
INTERDOMAIN_TRUST_ACCOUNT
0x0800
2048
WORKSTATION_TRUST_ACCOUNT
0x1000
4096
SERVER_TRUST_ACCOUNT
0x2000
8192
DONT_EXPIRE_PASSWORD
0x10000
65536
MNS_LOGON_ACCOUNT
0x20000
131072
SMARTCARD_REQUIRED
0x40000
262144
TRUSTED_FOR_DELEGATION
0x80000
524288
NOT_DELEGATED
0x100000
1048576
USE_DES_KEY_ONLY
0x200000
2097152
DONT_REQ_PREAUTH
0x400000
4194304
PASSWORD_EXPIRED
0x800000
8388608
TRUSTED_TO_AUTH_FOR_DELEGATION
0x1000000
16777216
PARTIAL_SECRETS_ACCOUNT
0x04000000 
67108864

----------------------------------------------------------------------------

PS C:\> Get-ADPrincipalGroupMembership -Identity username| select Name | Where-Object {$_.name -like '*ad group*' -or $_.name -like '*ADNAME*' } | Sort Name

Wednesday, April 22, 2020

GC authentication and sql windows auth for wildfly and how to download cert from command window.


LDAP access on port 3268 to a local agency Global Catalog server will allow for searching the entire Forest for users. Below is an example in PowerShell. First if I use my local DC on the normal port 389 it will not return any user information for DC1, and just returns an error:

Get-AdUser -Server dc1.domain.com:389 -SearchBase 'DC=dc2,DC=domain,DC=com' -Filter {UserPrincipalName -like "dc2user@domain.com"}


Get-AdUser -Server dc1.domain.com:389 -SearchBase 'DC=dc2,DC=domain,DC=com' -Filter {SAMAccountName -like "dc2user"}


Get-AdUser : The supplied distinguishedName must belong to one of the following partition(s): 'CN=Configuration,DC=domain,DC=com , CN=Schema,CN=Configuration,DC=domin,DC=com, DC=dc2,DC=domain,DC=com
, DC=DomainDnsZones,DC=dc2,DC=domain,DC=com, DC=ForestDnsZones,DC=domain,DC=com'.
At line:1 char:1
+ Get-AdUser -Server dc1.domain.com -SearchBase 'DC=dc2,DC=domin,DC=com' -Fi ...
+ ~~~~~~~~~~~~~~~~~~~~~~~~~~~~~~~~~~~~~~~~~~~~~~~~~~~~~~~~~~~~~~~~~~~~~
    + CategoryInfo          : InvalidArgument: (:) [Get-ADUser], ArgumentException
    + FullyQualifiedErrorId : ActiveDirectoryCmdlet:System.ArgumentException,Microsoft.ActiveDirectory.Management.Commands.GetADUser


However if I use it on the Global Catalog port, I can search dc2users (or indeed users anywhere in the Forest):

Get-AdUser -Server dc1.domain.com:3269 -SearchBase 'DC=dc2,DC=domain,DC=com' -Filter {UserPrincipalName -like "dc2user@domain.com"}


Get-AdUser -Server dc1.domain.com:3269 -SearchBase 'DC=dc2,DC=domain,DC=com' -Filter {SAMAccountName -like "dc2user"}


Global Catalogs allow you to get information about any user on the domain Forest without having to go to every single DC directly to do it. If you’re trying to do an LDAP integration that will work for users from multiple domains, using local GCs is the quickest and most reliable way to do it without having to add any extra logic to go to the correct DC.
-------------------------------------------------------------------------------------------------
SQL windows authentication 
1) put mssql-jdbc_auth-8.2.2.x64.dll and sqljdbc_auth.dll in wildflyhome\bin
2) <connection-url>jdbc:sqlserver://myserverurl;databaseName=mydb;integratedSecurity=true</connection-url>
     <security>
                <user-name></user-name>
                <password></password>
    </security>
----------------------------------------------------------------------------------------------------
keytool -printcert -sslserver ldapserver.domain.com:3269

openssl s_client -showcerts -connect ldapserver.domain.com:3269
cancel the popup window
the 64 base string will be within begin certificate and end certificate.
----------------------------------------------------------------------------------------------------
nltest /dclist:domain.div.com    get all names for dns
nslookup domain.div.com          get all ips for dns
nslookup                                     get all domain controller ip
netstat -a -o

dsa.msc 
dsquery server
-----------------------------------------------------------------------------------------


Friday, February 21, 2020

cert for assembly in sql

quoted from https://nielsberglund.com/2017/07/01/sqlclr-and-certificates/


You know that song. Yes, that song. The beeping. The arm flailing. The Safety Dance. I so wanted it stay in the 80s – along side the uncounted Wild Turkey inflicted hangovers. It just won’t. Every now and then that damn beeping rhythm creeps into my conscious thought when I least need it to. Like today. I’ve been trying to figure out how to use the last-minute-added ability to catalog signed assemblies that need External Access or Unsafe permission without having to set the database trustworthy bit. Getting frustrated with the interesting example in Books Online, the beeping started.
So here’s what you really need to know:
  1. The first you need is a certificate that can establish a chain of trust to some trusted root certificate authority on the target machine. If you’ve already got one thanks to having Certificate Server on your network or you’ve purchased one, great. If not, you can make one for yourself as we’ll do there.
  2. You need to understand the *interesting* inter-play of certificates, logins and signing assemblies. It is not hard once you understand that you can use a single certificate to do all of that.
  3. You will have to comfortable using the Command Shell and a couple of tools in the .NET Software Development Kit (SDK), namely SignTool and MakeCert.
In this case, the what of what I’m trying to deploy a simple enough method to be used as a stored procedure. The code gets has two parameters: the first is the name of parameter-less stored procedure to be executed; the second is the path for a file where the results of the called procedure will be written to in a comma-delimited format. The procedure returns the number of rows successfully written. Nothing hard, here is the code for that:
using System;
using System.Data;
using System.Data.SqlClient;
using System.Data.SqlTypes;
using Microsoft.SqlServer.Server;
using System.IO;
public partial class CSVUtilities
{
  public static SqlInt32 WriteCSV(SqlString ProcToExec,SqlString OutputPath)
  {
   int rows =0;
   bool writeComma = false;
   string outstr;
   DataTable dt = new DataTable();
   using(SqlConnection conn = new SqlConnection("Context Connection = true")) {
     using(SqlCommand cmd = new SqlCommand(ProcToExec.Value,conn)) {                
      using(SqlDataAdapter da = new SqlDataAdapter(cmd)) {
         conn.Open();
         da.Fill(dt);
      }
     }
   }
   using(StreamWriter output = File.CreateText(OutputPath.Value)) {
     // Write the column headers
     foreach(DataColumn dc in dt.Columns) {
       if(writeComma)
         output.Write(',');
       output.Write('"');
       output.Write(dc.ColumnName);
       output.Write('"');
       writeComma = true;
     }
     output.WriteLine();
     // Write the rows
     writeComma = false;
     foreach(DataRow dr in dt.Rows) {
       foreach(object field in dr.ItemArray) {
         outstr = field.ToString();
         if(outstr.Contains(@",")||outstr.Contains("\""))
           outstr = '"' + outstr.Replace("\"","\"\"") + '"';
         if(writeComma)
           output.Write(',');              
         output.Write(outstr);
         writeComma = true;
       }
       output.WriteLine();
       rows++;
       writeComma = false;
     }
     output.Flush();
   }                 
   return rows;
 }
};
The first thing we need a certificate issued by a Trusted Root Certificate Authority that we will sign our Assembly with. Remember that certificates represent the serialization of an asymmetric encryption key pair. Both the public and the private keys can be written to files as hexadecimal-encoded bytes. However, I simply do not have one of those, so we actually need two certificates here: one that we load into the local machine as a Trusted Root Certificate Authority and then the first certificate we wanted. Generating these certificates is easy you have the MakeCert.exe tool that ships with the .NET SDK. You should find it on the path C:\Program Files\Microsoft Visual Studio 8\SDK\v2.0\Bin\. This tool allows us to issue “self-signed” certificates. To generate the certificate we want to use as our Trusted Root, make sure that the path to MakeCert.exe is in your PATH environment variable then start a command shell. The command we will issue is:
makecert -sv SignRoot.pvk -cy authority -r signroot.cer -n "CN=Demo Cert Authority"
The arguments for that command mean:
  • -sv: this is the name of a file where will write the private key for this certificate
  • -cy: indicating that we intend to use this certificate as a root authority
  • -r: the name of the file that the public key will be written too
  • -n: the description we want used for the certificate
Note that you’ll have to provide a password for the private key. Once we have that key, we need to get into the local computers collection of certificates for Trusted Root Certificate Authorities. Start that process by running the public key file. Yes, you read that correctly: run it – type the signroot.cer and press enter. This will open a dialog called “Certificate” and on that, you should see a button labeled “Install Certificate.” Click that and the Certificate Import Wizard. Click next. On the next panel, select “place all certificates in the following store” then “browse” and select “Trusted Root Certificate Authority.” Once you have that selected, click next then click finish. We will use this certificate as our “issuer” certificate for the next. Now we can use MakeCert again to generate the certificate we will use to sign our Assembly. Here is the command for that, followed by its parameters:
makecert –m 360 –n “CN=Demo Signing Certificate” –iv signroot.pvk –ic signroot.cer –cy end –pe –sv signcert.pvk signcert.cer
  • -m: this indicates a number of months from today before until this certificate expires.
  • -iv: this is the private key file for the issuer certificate
  • -ic: this is the public key for the issuer certificate
  • -cy: this indicates that this is an “end-of-chain” certificate
  • -pe: causes the private key for this certificate to marked as exportable
  • -sv: the name of the file for this certificate’s private key
Our next step is compile the assembly. You may have noticed that my code did not have any SQL-Server specific attributes indicating how we want the method deployed as a procedure. That’s simply because I’m going to manually deploy this assembly and those steps follow. There’s no reason I could not have used Visual Studio to deploy a signed assembly, but here the manual deployment allows us to see the inner workings to the process. The command for compilation is simple enough:
csc.exe /t:library /warnaserror+ /out:csvlibrary.dll CsvUtility1.cs
Where the /t option tells the compiler that we are generating a library instead of an executable. The /warnaserror+ causes the compiler to treat any warning as an error, forcing me to fix those before moving on. The /out indicates that I want the assembly compiled into a file named csvlibrary.dll. Once we have the assembly built, we are ready to sign it with the new certificate. The command line for that is:
signtool signwizard csvlibrary.dll
This command brings up a new version of the SignCode utility you already may be familiar with. Microsoft has upgraded SignCode to SignTool for .NET 2.0. Let us walk through the signing wizard:
  1. On the title screen, click next.
  2. The file-to-be-sign information should already be filled in, so click next
  3. Select Custom and click next
  4. Select “select from file” and find the signcode.cer file. Be sure not to select the signroot.cer file. Once you have that selected, click next
  5. Pick the “private key from disk option,” browse and select the signcert.pvk file. Again, make sure not select the signroot.pvk file
  6. Click next five more times to get to the “Completing the Digital Signing Wizard” screen, then click “finish.” You’ll have to enter the password one more time.
The assembly should now be signed. We can verify that with one last command line option:
signtool verify csvlibrary.dll
We are about half-done with the process: we have a signed assembly and certificate suitable for use with SQL Server 2005. We can dance, sure, but can we sing? Let us try. Fire up management studio and start a new query to your test database. I am using esql_01sqlclr for this example. Make sure you have disabled trustworthy access for this database (e.g., issue alter database esql_01sqlclr set trustworthy off  if needed). We need to issue a few start-up commands:
use master
go
create certificate CSVAsmCert from file = 'c:\esql\01_sqlclr\signcert.cer'
create login CSVAssembler from certificate CSVAsmCert
revoke connect sql from csvassembler
grant external access assembly to CSVAssembler
grant unsafe assembly to CSVAssembler
go
This probably seems like an odd series of commands, so let us break them down. The first two simply change our command context to the master database. Next, we create a SQL Server Certificate object from the certificate we used to sign the assembly with, then we create a login on from that certificate. Yes, you can create a login from a certificate in SQL Server 2005. In this case that is useful because cataloging an external access or unsafe assembly in a non-trustworthy database requires that the assembly be signed and that a security principal (typically a login) based on the same certificate also exist. This provides a two-factor security mechanism for authenticating and authorizing assemblies. Ideally, this makes it harder to someone to inject a potentially harmful assembly into SQL Server since they would also have to have the correct permissions to create a login based on the same certificate used to sign the assembly. Of course, it also makes for extra steps for us. Note that we really do not need or want that login to be used for anything other than providing context for our cataloging operation. This is why I issue the revoke connect on the newly created login. However, that login does need to be able to catalog assemblies, so I do explicitly grant it those permissions. So now we can use this principal to catalog objects into any database we would like to going forward.
The next step takes us back to the database where we want to catalog the assembly and create a master key for that database to use. We need that key to correctly create and store certificates within that database. The next commands to issue are:
use esql_01sqlclr
go
create master key encryption by password = 'p4ssw0rd!'
Yeah, I know, it is a lame password. You’ll do better. Now we need to create another SQL Server Certificate. This one maps the same certificate we signed the assembly with into the database. The command is:
create certificate SignCert from file = 'c:\esql\01_sqlclr\signcert.cer' with private key (file = 'c:\esql\01_sqlclr\signcert.pvk',decryptionpassword='p4ssw0rd!',encryption by password='p4ssw0rd!')
All that’s really different here compared to what we did in the master database – aside from the name – is that we specified where the private key comes, the password required to open that file and the password we want SQL Server 2005 to use to store the private key as well. We do that so we can reuse this certificate again to catalog additional assemblies without having to recreate this certificate.
We are just about done. What remains is cataloging the assembly and creating the desired stored procedure from it. That is easy enough:
create assembly CSVUtil from 'c:\esql\01_sqlclr\csvlibrary.dll' with permission_set = external_access;
go
create procedure dbo.writeCSV
(@procToExecName nvarchar(4000),@outputPath nvarchar(4000))
as
external name CSVUtil.CSVUtilities.WriteCSV;
go
And that’s all there is to it. Yes, it is quite a procedure, but that is by design. Remember that the idea here is make it as hard as possible to inject hostile assemblies into database. Microsoft does that requiring a security principal – in this case a login – that’s bound to the same trusted certificate that the assembly was signed with. You have to be able make changes in both the master and target databases as well. Then you have to actually catalog the assembly, map a T-SQL object to it execute that object. On one hand, that makes it a pretty hard barrier for many attackers to work around. On the other hand, it complicates the loading of desired assembly. But as long as you remember that need a trusted certificate for both the login and for signing the object, that you can use MakeCert to create the needed certificate(s) if you do not already have them and that you now need to use SignTool instead of SignCode, you can dance this Safety Dance if you want to.
Then surprise them with a victory cry!
Feel free to the use the “contact me” link on this site if you’d like the code and scripts talked about herein.
Posted on Thursday, February 16, 2006 12:18 PM | Back to top

Tuesday, December 17, 2019

fixed 100% disk IO in windows

fixed 100% disk IO in windows.

1) C:\WINDOWS\system32>chkdsk.exe /f /r
The type of the file system is NTFS.
Cannot lock current drive.

Chkdsk cannot run because the volume is in use by another
process.  Would you like to schedule this volume to be
checked the next time the system restarts? (Y/N) y

This volume will be checked the next time the system restarts.

2) C:\WINDOWS\system32>net.exe stop superfetch
The Superfetch service is stopping.
The Superfetch service was stopped successfully.