Friday, September 6, 2024

CI/CD for Git pipeline for java

1) download PortableGit-2.46.0-64-bit

2) modify E:\PortableGit-2.46.0-64-bit.7z\etc\gitconfig to remove credentialselector window

[core]

symlinks = false

autocrlf = true

fscache = true

[color]

interactive = true

ui = auto

[help]

format = html

[diff "astextplain"]

textconv = astextplain

[rebase]

autosquash = true

[filter "lfs"]

clean = git-lfs clean -- %f

smudge = git-lfs smudge -- %f

process = git-lfs filter-process

required = true

[credential]

helper = !\"E:/PortableGit-2.46.0-64-bit.7z/mingw64/bin/git-credential-manager.exe\"

3) create package

e:\nuget.exe pack L:\TFS_CATS\FamlinkClassic\sacwis-libraries\Sprint-Active\master\sacwis-web-java\Package.nuspec -OutputDirectory L:\TFS_CATS\FamlinkClassic\sacwis-libraries\Sprint-Active\master\sacwis-web-java\

4)  push package to feed

#e:\nuget.exe push L:\TFS_CATS\FamlinkClassic\sacwis-libraries\Sprint-Active\master\JspcCompile\Jasperlib.1.0.0.nupkg -src #http://dshsutoly3dut06:8080/tfs/CATS/_packaging/test/nuget/v2 -ApiKey DSHSVSTS

5) register package if not registered yet.

$nuget = Get-PackageSource | Where-Object -filterscript {$_.Name -eq 'sawcislib'}

if($nuget -eq $null){Register-PackageSource -Force -Name sawcislib -Location http://dshsutoly3dut06:8080/tfs/CATS/_packaging/test/nuget/v2 -ProviderName NuGet}else{Write-Output 'sawcislib has been registered'}

6) install package

Install-Package -Force -Name sawcislib -Destination $(Build.SourcesDirectory) -Source sawcislib -MinimumVersion 1.0.3 -MaximumVersion 1.0.3

Wednesday, May 29, 2024

Git in VS code

https://code.visualstudio.com/docs/sourcecontrol/intro-to-git#:~:text=Pick%20an%20existing%20or%20new,init%20on%20the%20command%2Dline.

Introduction to Git in VS Code

Want to easily manage your source code and collaborate with others? Git and GitHub are the tools you need! And with Visual Studio Code, you can set up and use them in a snap. Even if you're a beginner, VS Code's user-friendly interface guides you through common Git actions like pushing and pulling code, creating and merging branches, and committing code changes. And if you're a pro, you'll love the ability to perform Git actions directly within the editor, saving you time and effort compared to using the Git command line. Plus, the seamless workflow between VS Code and Git means you can stay in your editor and get more done.

Set up Git in VS Code

To use Git and GitHub in VS Code, first make sure you have Git installed on your computer. If Git is missing, the Source Control view shows instructions on how to install it. Make sure to restart VS Code afterwards.

Additionally you can sign into VS Code with your GitHub account in the Accounts menu in the lower right of the Activity bar to enable additional features like Settings Sync, but also cloning and publishing repositories from GitHub.
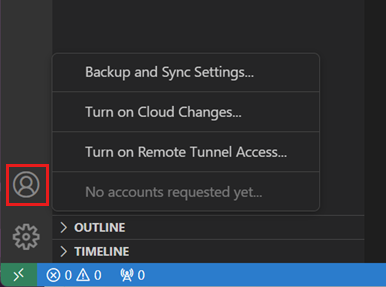
Screenshot of the Accounts menu in VS Code

Open a Git repository

VS Code provides several ways to get started in a Git repository, from local to remote cloud-powered environments like GitHub Codespaces.

Clone a repository locally

To clone a repository, run the Git: Clone command in the Command Palette (⇧⌘P), or select the Clone Repository button in the Source Control view.

If you clone from GitHub, VS Code prompts you to authenticate with GitHub. Then, select a repository from the list to clone to your machine. The list contains both public and private repositories.

Screenshot of the Clone Repository quick prompt, searching for repositories with the name vscode

For other Git providers, enter the repository URL, select Clone, and pick a folder on your local machine to clone the files into. VS Code opens the folder once the repository is cloned on your local machine.
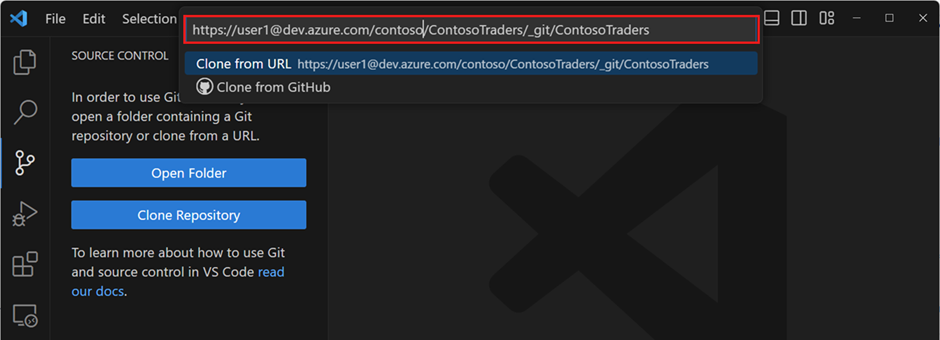
Screenshot of the Clone Repository quick prompt, searching for a repository by providing the repository URL

Initialize a repository in a local folder

To initialize a new local Git repository:

  1. Pick an existing or new folder on your computer and open it in VS Code.

  2. In the Source Control view, select the Initialize Repository button.

    This creates a new Git repository in the current folder, allowing you to start tracking code changes.

    This action is equivalent to running git init on the command-line.
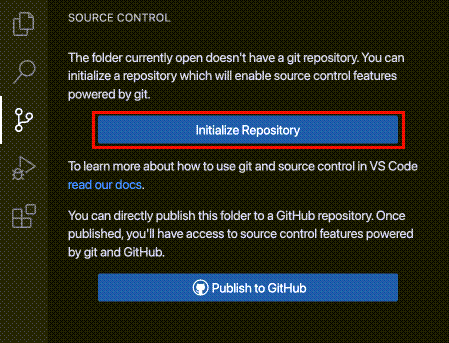
    Source Control view for a workspace not under Git source control will offer to Initialize a Git repo or Publish to GitHub

Publish local repository to GitHub

You can also initialize and local repository and publish it directly to GitHub. This creates a new repository on your GitHub account, and pushes your local code changes to the remote repository. Having your source code on a remote repository is a great way to back up your code, collaborate with others, and automate your workflow with GitHub Actions.

Use the Publish to GitHub command button in the Source Control view. You can then choose a name and description for the repository, and whether to make it public or private.
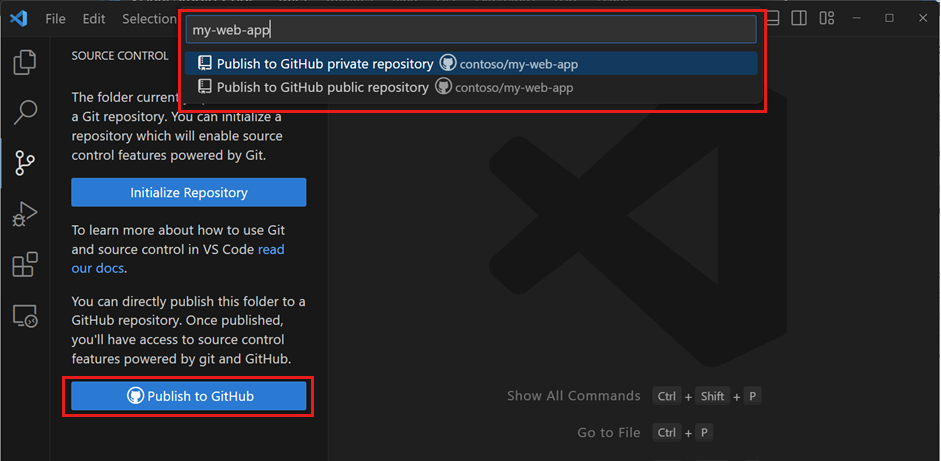
Screenshot of the Publish to GitHub quick prompt, showing private and public GitHub repository names

Once the repository has been created, VS Code pushes your local code to the remote repository. Your code is now backed up on GitHub, and you can start collaborating with others with commits and pull requests.

Open a GitHub repository in a codespace

GitHub Codespaces lets you open a GitHub repository in a fully configured cloud-based development environment, enabling you to develop in a browser without having to install any software on your local computer. GitHub Codespaces allows free usage for individuals, which makes it easy to get started working on open source projects.

To create a codespace for your GitHub repository:

  1. Install the GitHub Codespaces extension in VS Code and sign in with your GitHub account.

  2. Run the Codespaces: Create New Codespace command.

  3. Select the repository and branch you want to open.

    VS Code opens a new window, which is connected to the codespace. The source code, terminal, and running and debugging are hosted in the remote cloud-based development environment.

    Notice that the File Explorer and Status Bar indicate that the workspace is opened in a codespace.
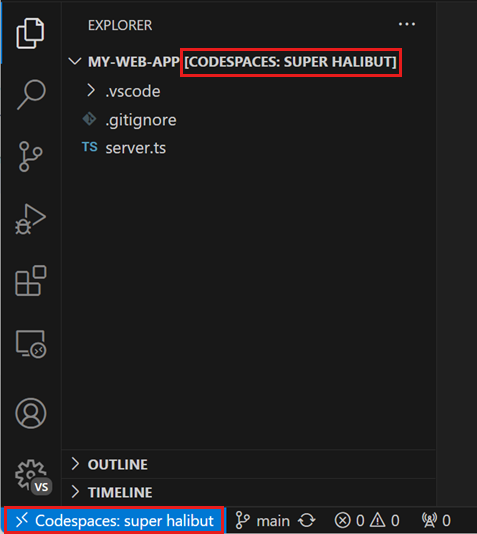
    Screenshot of a workspace opened in a codespace, highlighting the codespace name in the File Explorer and Status Bar

Alternatively, you can also start from a codespace template on the GitHub Codespaces website.

If you already have a codespace open in your browser, run the Codespaces: Open in VS Code Desktopcommand in the browser to connect to the codespace from your local VS Code Desktop.

You can learn more about GitHub Codespaces, including customization such as forwarding ports, in the Developing in a codespace documentation.

Open a GitHub repository remotely

VS Code's remote repository support allows you to browse and edit a GitHub repository without cloning it to your local computer. This is useful for quickly making changes to a remote repository without having to clone the entire codebase to your machine.

  1. First install the GitHub Repositories extension.

  2. Run the command Remote Repositories: Open Remote Repository... or use the Open Remote Repository button the Explorer view.

  3. Search and select the GitHub repository that you want to open.

    Remote Repositories opening a remote GitHub repo, pull request or Azure repo

Tip: If you need to execute code or run terminal commands, you can seamlessly switch from a remote repository to a codespace with the command Continue Working on.

Staging and committing code changes

Once you have a Git repository set up, you can start tracking code changes by staging and committingyour newly created and edited code.

Tip: Commit your changes early and often. This makes it easier to revert back to previous versions of your code if needed.

You can access the Source Control view from the Activity Bar to list all changed files in your workspace. You can toggle between a tree view or list view by using the tree/list icon in the Source Control view header.
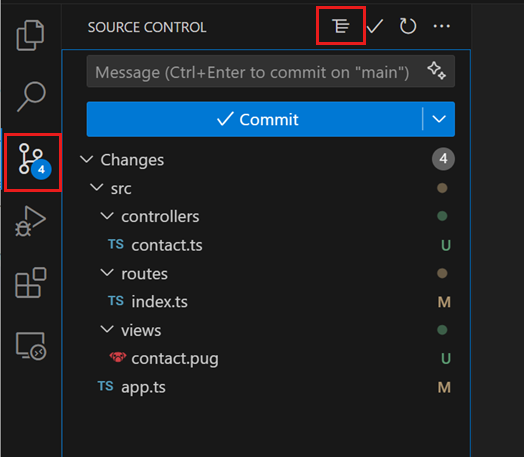
Source Control view, highlighting the tree/list view control in the header

When you select a file in the Source Control view, the editor shows a diff view that highlights the file changes, compared to the previously committed file.
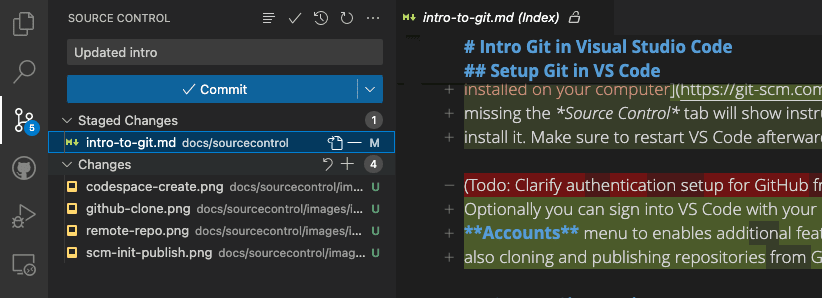
Source Control view with one file staged and other changes, a diff showing in the editor that highlights the changes

To stage a file, select the + (plus) icon next to the file in the Source Control view. This adds the file to the Staged Changes section, indicating that it will be included in the next commit.
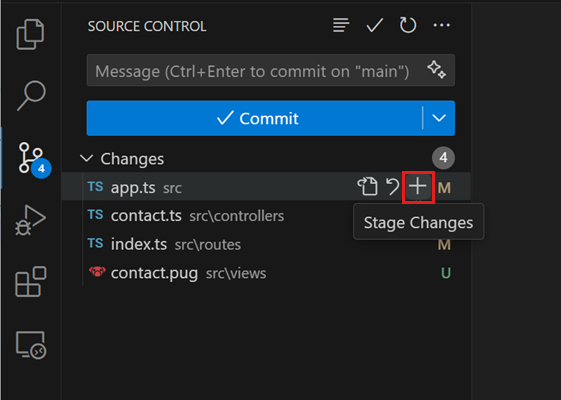
Source Control view with four changed files, highlighting the '+' button to stage the changes of a file

You can also stage all pending changes at once by selecting the + (plus) icon next to Changes in the Source Control view.

Staged changes can also be discarded by selecting the  (minus) icon next to the file. Similarly, you can discard all staged changes by selecting the  (minus) icon next to Staged Changes in the Source Control view.
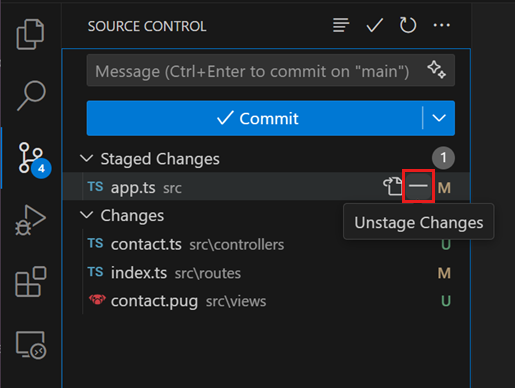
Source Control view with four changed files, highlighting the '-' button to unstage the changes of a file

To commit your staged changes, type a commit message in the upper text box, and then select the Commit button. This saves your changes to the local Git repository, allowing you to revert to previous versions of your code if needed.

Tip: If you have a GitHub Copilot subscription, and installed the Github Copilot extension, you can use the sparkle icon to generate a commit message.

You can navigate through and review all local file changes and commits in the Timeline view available in the bottom of the Explorer view.

Timeline view with one item selected and its change being shown in the editor

Pushing and pulling remote changes

Once you have made commits to your local Git repository, you can push them to the remote repository. The Sync Changes button indicates how many commits are going to be pushed and pulled. Selecting the Sync Changes button downloads (pull) any new remote commits and uploads (push) new local commits to the remote repository.

Sync button with one change to push

Tip: You can enable the Git: Autofetch setting to always get an up-to-date remote commit indicator.

Push and pull can also be performed individually by using their respective commands. You can access these commands from the Source Control menu.
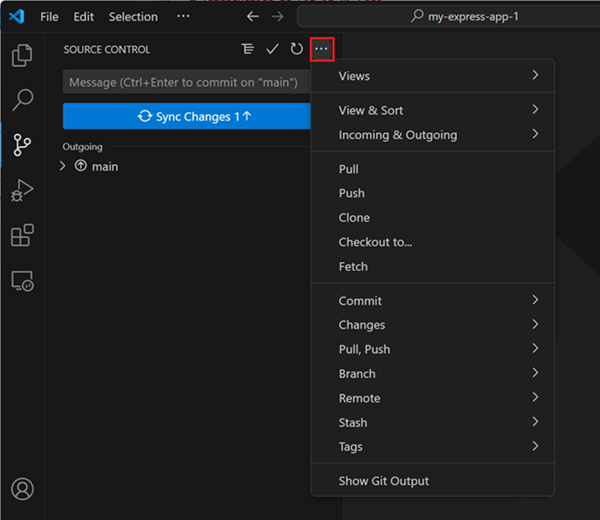
Source Control menu that shows all source control commands

Using branches

In Git, branches allow you to work on multiple versions of your codebase simultaneously. This is useful for experimenting with new features or making large code changes without affecting the main codebase.

The branch indicator in the Status bar shows the current branch and lets you switch to new and existing branches.

Branch indicator in the Status bar

To create a new branch, select the branch indicator and choose to create it from the current branch or another local one. Type a name for the new branch, and confirm. VS Code creates a new branch and switches to it, allowing you to make changes to your code without affecting the main branch.
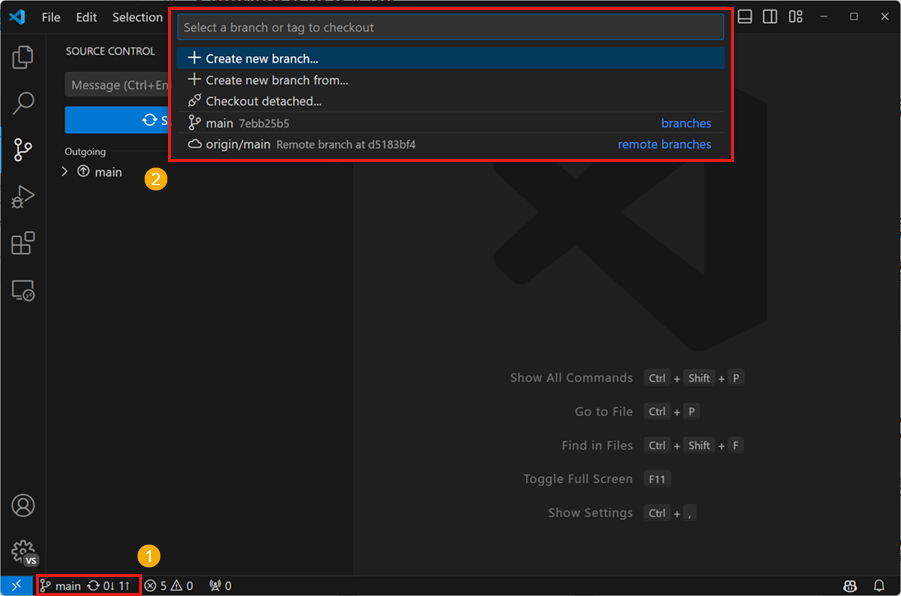
Create branch quick prompt that shows when selecting the branch indicator

Tip: If you use the GitHub Pull Requests and Issues extension, you can create a branch directly from an issue, which gets you started working in a new local branch and automatically prefills the pull request for you.

After you create a local branch, you can push the branch to the remote repository by selecting Publish Branch in the Source Control view. This creates a new branch on the remote repository, allowing you to collaborate with others in that branch.

Creating and reviewing GitHub pull requests

In Git and GitHub, pull requests (PRs) are a way for collaborators to review and merge code changes from separate branches into the main branch. This enables teams to review and approve code changes before they are incorporated into the main codebase, ensuring that only high-quality changes are merged.

To use pull requests in VS Code, you need to install the GitHub Pull Requests and Issues extension. This extension adds PR and issue tracking functionality to VS Code, allowing you to create, review, and merge PRs from within the editor.

To create a PR, make sure you are on a separate branch from the main branch, and push your code changes to the remote repository. In the Source Control view, select the Create Pull Request button. This opens the PR creation form, where you can enter a title and description for the PR, and choose which branch to merge the changes into. Select Create to create the PR.
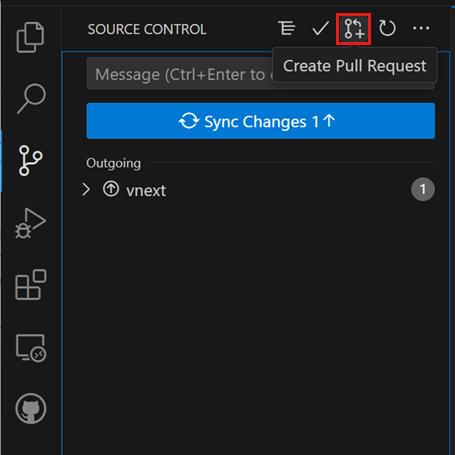
Source Control view, highlighting the 'Create pull request' button

To review a PR, select the Review Pull Request button in the Source Control view, and select the PR you want to review. This opens the PR in a new editor window, where you can review the code changes and leave comments. Once you are satisfied with the code changes, you can select the Merge button to merge the PR into the targeted branch.

Learn more about pull requests in VS Code's GitHub documentation.

Using Git in the built-in terminal

As all Git state is kept in the local repository, you can easily switch between VS Code's UI, the built-in terminal, or external tools like GitHub Desktop. You can also set up VS Code as your default Git editor, allowing you to use VS Code to edit commit messages and other Git-related files.

Git Bash on Windows

Git Bash is a popular shell environment for Windows that provides a Unix-like command-line interface for working with Git and other command-line tools. Visual Studio Code's integrated terminal supports Git Bash as a shell, allowing you to seamlessly integrate Git Bash into your development workflow. Installing Git on your Windows machine also installs Git Bash, if it wasn't deselected during the installation steps.
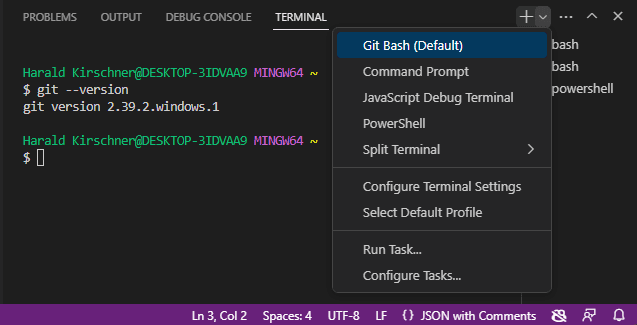
Selecting Git Bash as shell in Visual Studio Code's built-in terminal

Start by opening View > Terminal (⌃`). Select the dropdown arrow next to the + icon in the terminal panel to pick a new shell to open. If Git Bash is installed, it's shown in the list of terminals and shells. You can toggle between different terminals and shells in the Terminal sidebar. With Git Bash configured in Visual Studio Code, you can now use all of your favorite Git commands directly from the terminal in your code editor.

If you want to set Git Bash as your default shell, open the Terminal dropdown (next to the + icon) and select Select Default Profile. This opens a list of available shells, including Git Bash. Selecting Git Bash sets it as your default shell, and all future terminals will be opened with Git Bash. More advanced terminal tips are available in the terminal documentation.

Wednesday, May 8, 2024

azure authentication settings

       <property name="CLIENT_ID" value="a3162c28-a1f8-44fe-b9ff-3273d76460cb"/>

       <property name="AUTHORITY" value="https://login.microsoftonline.com/8989c46a-8505-48db-a1f3-0633336b8ef3"/>

        8989c46a-8505-48db-a1f3-0633336b8ef3 = tenant id

        <property name="SCOPES" value="user.read"/>

        <property name="SECRET" value="lID8Q~DmpQS7ctRmEgvdykSBPX3u9AQ2PiS7AcHM"/>

        SECRET = secret value

        <property name="AZDOMAIN" value="weiwangdcyfwa.onmicrosoft.com"/>

        <property name="SIGN_OUT_ENDPOINT" value="/oauth2/v2.0/logout/"/>

        <property name="POST_SIGN_OUT_FRAGMENT" value="?post_logout_redirect_uri="/>

        <property name="HOME_PAGE" value="http://localhost:8080/famlink"/>

        <property name="REDIRECT_ENDPOINT" value="/AADRedirectServlet"/>

        <property name="STATE_TTL" value="600"/>

        <property name="SESSION_PARAM" value="msalAuth"/>

        <property name="PROTECTED_ENDPOINTS" value="/token_details"/>

        <property name="AZUREAD_GROUPS" value="f54389cf-5a43-4c78-815a-e4f0a404b285,d60796e2-c612-455c-9e06-e2e16404c7b1"/>

Monday, April 22, 2024

install build task extension to tfs

 add build extension on TFS

1) go to Marketplace to download vsix file.

2) choose Manage extensions from TFS


3) click browse local extensions to upload vsix file.

4) click Manage extensions

5) click upload new extension

6) After upload vsix file, click the extension link to install the extension to your TFS project collection.


Tuesday, January 16, 2024

MAUI with VSCode

 C:\Users\<profile>\AppData\Local\Xamarin\MonoTouch delete contents to refresh ssh key

C:\Users\wangwei\AppData\Roaming\NuGet to delete NGet.config to refresh nuget installation

ifconfig getifaddr en0


https://www.youtube.com/watch?v=i4l9NQEJueI

1) in the search bar, type > MAUI Archive

    select project

    select provisioning file

or from the terminal in VSCode

dotnet publish "/Users/wangwei/Documents/CATS/FamlinkMobile/Development/MauiApp1/MauiApp1/MauiApp1.csproj" -f net8.0-ios -c Release -p:ArchiveOnBuild=true -p:RuntimeIdentifier=ios-arm64  -p:CodesignKey="iPhone Distribution: Washington State DSHS CA Technology Services" -p:CodesignProvision="DCYFMirrorCasesProvisioningFile"


Wednesday, December 20, 2023

SVN to Git to TFS

1. install Git-SVN bash for windows. https://git-scm.com/download/win (64-bit Git for Windows Portable.)

2. From cmd to launch MinGW64

    start "" "C:\Admin\PortableGit-2.43.0-64-bit.7z\bin\bash.exe" 

3. From MinGW64

    mkdir -p ~/GitMigration

4. create a user transformation file

svn log http://dshsutlcy3dut02.dshs.wa.lcl:9083/svn/DSHS-CA/sacwis-web/branches/DCYF/Sprint-Active --quiet | grep -E "r[0-9]+ \| .+ \|" | cut -d'|' -f2 | sed 's/ //g' | sort | uniq > svn-authors.txt

jdoe = John Doe <john.doe@gmail.com>

esmith = Emma Smith <emma.smith@gmail.com>

first column is SVN user and 2nd column is Git user

5. create an empty git repository from TFS and copy the git command for http

6. git svn clone http://dshsutlcy3dut02.dshs.wa.lcl:9083/svn/DSHS-CA/sacwis-build-xml/branches/DCYF/Sprint-Active/sacwis-web-tfs-build-xml SVNGit --authors-file=../authors-transform.txt -r 9750:HEAD

   check out svn to a git folder

7. clean up

   for t in $(git for-each-ref --format='%(refname:short)' refs/remotes/tags); do git tag ${t/tags\//} $t && git branch -D -r $t; done

   for b in $(git for-each-ref --format='%(refname:short)' refs/remotes); do git branch $b refs/remotes/$b && git branch -D -r $b; done;

   for p in $(git for-each-ref --format='%(refname:short)' | grep @); do git branch -D $p; done;

8. create a repository on Git server (etc. devopts) (this is an optional step if you want to check in Git)

    
        git remote add origin http://dshsutoly3dut06:8080/tfs/CATS/FamlinkClassic/_git/sacwis-git

git remote set-url origin https://weiwang0944@dev.azure.com/weiwang0944/pltest1/_git/migration

git push origin --all;

git push origin --tags;

     git push origin master:Sprint-Active (push a particular local branch to a particular remote                         branch git push origin local:remoe)

    
        (Cannot determine the organization name for this 'dev.azure.com' remote url. ensure             the credential.usehttppath configuration value is set, or set the organization name as the user in the remote url '{org}@dev.azure.com'.) 

git config --global credential.useHttpPath true (for SSO login issue above)

git remote add origin https://weiwang0944@dev.azure.com/weiwang0944/pltest1/_git/migration

reset origin if needed


--------------------------------------------------------------------------------------------------------------------

install git-tf

cd to SVNGit on cmd

1. set origin

    git-tf configure http://dshsutoly3dut06:8080/tfs/CATS $/FamlinkClassic/sacwis-build-xml/GitTFS

2. check in 

    git-tf checkin --deep


----------------------------------------------------------------------------------------------------------------------

https://medium.com/codex/how-to-migrate-svn-to-git-b625a21575b2

I was recently working on a migration project which involved migrating our codebase from SVN to GitHub. After a few trials and errors and plenty of hours searching the web for best practices, I finally managed to develop a system that did not cause any tears during the process and I thought it would be nice to share it with you.

I have broken down this migration process into 4 simple steps:

  1. Prepare your environment
  2. Convert your SVN repository to a local git repository
  3. Convert any large files to lfs objects (if needed)
  4. Push the new git repository to GitHub

Prepare your environment

On your local machine create a GitMigration folder which will host your new git repo: mkdir -p ~/GitMigration

In another command line update the SVN repo to make sure that you have the latest revisions. It would be also wise to inform your team that you are starting the migration and no more commits will be allowed to be pushed to SVN until the migration process is complete.

Once that is done you will need to create an authors.txt file. This will map the SVN usernames to the desired Git usernames in the following format:

jdoe = John Doe <john.doe@gmail.com>
esmith = Emma Smith <emma.smith@gmail.com>

If you don’t want to find all the authors in the SVN manually you can pull the data from the SVN repository using the following command, just make sure that the final format follows the same structure as above:

svn log -q | awk -F '|' '/^r/ {gsub(/ /, "", $2); sub(" $", "", $2); print $2" = "$2" <"$2">"}' | sort -u > authors.txt

Convert your SVN repository to a local git repository

If you want to only migrate commits from a certain time period, you will need to locate the revision number in the SVN repo. To do this execute the following command in the svn repo folder:

svn log -r {YYYY-DD-MM}:HEAD --limit 1

Within the GitMigration folder execute the following command:

git svn clone <svn-repo>/<project> <git-repo-name> --authors-file=authors.txt -r <revision-number>:HEAD

Where <svn-repo> is the URI of the SVN repository that you want to migrate, <project> is the name of the project that you want to import, and <revisions-number> is the revision number that you want to migrate from (if needed). The<git-repo-name> is the directory name of the new Git repository. This process might take a while, depending on the size of the SVN commits.

Now comes the clean-up, moving the tags and any remote refs to local branches. To move the tags to proper Git tags execute the following within the git repo directory:

for t in $(git for-each-ref --format='%(refname:short)' refs/remotes/tags); do git tag ${t/tags\//} $t && git branch -D -r $t; done

Next, move any references under refs/remote and turn them to local branches

for b in $(git for-each-ref --format='%(refname:short)' refs/remotes); do git branch $b refs/remotes/$b && git branch -D -r $b; done;for p in $(git for-each-ref --format='%(refname:short)' | grep @); do git branch -D $p; done;

Convert any large files to LFS objects

GitHub has a file limit of 100MB, anything over that size will be refused to be pushed into GitHub. This is where Git Large File Storage (LFS) comes in. Git LFS replaces any large files with text pointers inside Git while storing the file contents on a remote server. There are many benefits to using LFS such as

  • Large file versioning
  • More repository space
  • Faster cloning and fetching
  • Same Git workflow
  • Same access controls and permissions

To find out how many files that are above the 100MB limit run the following command:

git lfs migrate info --everything --above=99MB

this will print out information about the different file types in your repo that are above the 99MB mark (as shown below).

To convert the files to LFS file objects run the following command:

git lfs migrate import --everything --above=99MB

This will rewrite the history of the git repo that contained any files that were above 99MB and convert them to LSF objects.

Push the new git repository to GitHub

The final step is to add the remote git server and push the changes.

git remote add origin git@my-git-server:myrepository.gitgit push origin --all;git push origin --tags;

And that’s it! Congratulations, you have migrated your SVN repo into Git. The next step is to inform your team that the migration is complete and provide them access to the new remote git server.

----------------------------------------------------------------------------------


https://blog.simontimms.com/2013/04/02/importing-a-git-repository-into-tfs/

Now drop into the git repository you want to push to TFS and enter

git tf configure http://tfsserver:8080/tfs $/Scanner/Main

Wherehttp://tfsserver:8080/tfs is the collection path for your TFS server and$/Scanner/Main is the server path to which you’re pushing. This will modify your .git/config file and add the following:

[git-tf “server”] collection =http://tfsserver:8080/tfs serverpath =$/Scanner/Main

Your git repository now knows a bit about TFS. All you need to do now is push your git code up and that can be done using

git tf checkin --deep

This will push all the commits on the mainline of your git repo up into TFS. Without the ““deep flag only the latest commit will be submitted.

There are a couple of gotchas around branching. You may get this error:

git-tf: cannot check in - commit 70350fb has multiple parents, please rebase to form a linear history or use –shallow or –autosquash

You canflattenyour branches by either rebasing or by passing git-tf the ““autosquash flag which will attempt to flatten the branching structure automatically. I’m told that autosquashing can consume a lot of memory if there are a lot of commits in the repository. I have not had any issue but my repositories are small and my machine has 16GB of memory.

Now you have move all your source code over to TFS. Yay.

I’m not going to point out that if you keep git-tf around you can continue to work as if you have git and just push commits to TFS. That would likely be against your company’s policies

--------------------------------------------------------------------------------------------------------------

https://stackoverflow.com/questions/39478482/how-to-create-development-branch-from-master-on-github


Creating a git develop branch

You can list all of your current branches like this:

git branch -a

This shows all of the local and remote branches. Assuming you only have a single master branch, you'd see the following:

* master
  remotes/origin/master

The * means the current branch.

To create a new branch named develop, use the following command:

git checkout -b develop

The -b flag creates the branch. Listing the branches now should show:

* develop
  master
  remotes/origin/master

Changing branches

You shouldn't commit anything directly to the master branch. Instead do all your work on the develop branch and then merge develop into master whenever you have a new public release.

You are already in your develop branch, but if you weren't, the way to switch is as follows:

git checkout develop

That's the same way you create a branch but without the -b.

Making changes on develop

When making changes, add and commit as usual:

git add .
git commit -m "whatever"

The first time you push to your remote do it like so:

git push -u origin develop

The -u flag stands for --set-upstream. After the first time you only need to do it like this:

git push

Merging develop to master

Once your develop is ready to merge into master you can do it like so:

First switch to your local master branch:

git checkout master

To merge develop into master do the following:

git merge develop

Then push the changes in local master to the remote master:

git push

Done.

Deleting a branch

If you don't need the develop branch anymore, or you just want to delete it and start over, you can do the following:

Delete the remote develop branch:

git push -d origin develop

Then delete the local branch:

git branch -d develop

The -d means delete.

------------------------------------------------

git config --global user.name "John Doe"

git config --global user.email "johndoe@email.com"


.