A WildFly Domain consists in grouping several WildFly instances into one single group (or a “server-group” using the WildFly nomenclature). In fact, we group the WildFly server into one logical server-group, and all the WildFly instances will share the same configuration. By this we intend that they share the same WildFly profile ( default , ha , full , and full-ha ), same deployments, and so on. In this tutorial we will show all the steps to configure a WildFly Domain.
In order to configure our domain we will at first configure the Domain Controller and its domain.xml configuration file. Next we will configure the hosts where the applications will be deployed.
Domain controller set up (domain.xml)
The server configuration of the domain is centralized in the domain.xml file of the domain controller. The domain.xml is located in the directory $JBOSS_HOME/domain/configuration. It includes the main configuration for all server instances. This file is only required for the Domain Controller.
In the domain.xml file we will define the server group configuration (which can be anyway changed at runtime, as we will see in a minute).
<server-group name="main-server-group" profile="full">
<heap size="64m" max-size="512m"/>
<socket-binding-group ref="full-sockets"/>
<server-group name="other-server-group" profile="full-ha">
<heap size="64m" max-size="512m"/>
<socket-binding-group ref="full-sockets"/>
This domain configuration reflects the following schema:
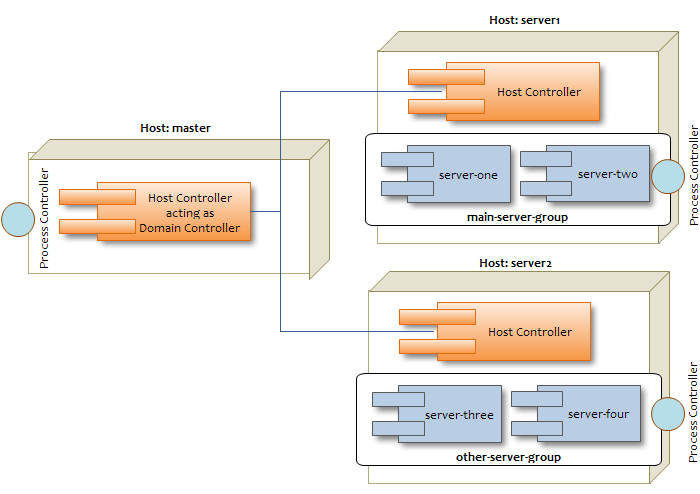
As you can see, we have two server groups: main-server-group and other-server-group. You can in turn associate each server group with a different profile.
The default configuration includes four preconfigured profiles:
- default – Support of Java EE Web-Profile plus some extensions like RESTFul Web Services or support for EJB3 remote invocations
- full – Support of Java EE Full-Profile and all server capabilities without clustering
- ha – default profile with clustering capabilities
- full-ha – full profile with clustering capabilities
A profile contains the configuration of the supported subsystems that is added by an extension. We choose the full profile which contains all WildFly / JBoss EAP capabilities, except for clustering.
The referenced profile will be assigned by the server group to one socket-binding group. A socket-binding group references to logical interface names instead direct to the interfaces of a host. These logical interfaces are defined in the <interfaces> section of the domain.xml configuration file.
<interface name="management"/>
<interface name="public"/>
<interface name="unsecure"/>
The exact binding of the interfaces with the IP address is done into the host.xml file, however we will leave it with the default values and use start up properties to override these values.
Configuring the host.xml of the Domain controller
The first thing we need to check, is that the host controller acts as domain controller. This is stated by the domain-controller element:
Next, since we won’t add any server on this host, we need to state it, using an empty servers element:
Last thing we need to do, is creating a management user which will be used to authenticate from the other host controllers, when connecting to the domain controller. For this purpose we will use the add-user.sh shell script which is located in the bin folder of JBOSS_HOME folder:
$./add-user.sh

What type of user do you wish to add?
 a) Management User (mgmt-users.properties)
 b) Application User (application-users.properties)
(a): a

Enter the details of the new user to add.
Realm (ManagementRealm) :
Username : admin1234
Password :
Re-enter Password :
Are you sure you want to add user 'domain' yes/no? y

About to add user admin1234 for realm 'ManagementRealm'
Is this correct yes/no? y
Added user 'admin1234' to file '/standalone/configuration/mgmt-users.properties'
Added user 'admin1234' to file '/domain/configuration/mgmt-users.properties'

Is this new user going to be used for one AS process to connect to another AS process e.g.
slave domain controller?
yes/no? y

To represent the user add the following to the server-identities definition
<secret value="ZnJhbmsxMjMh" />
TIP! You can use the add-user.sh in non interactive mode to create the management user and show the secret. Ex: add-user.sh -u admin1234 -p Password1!
Now we can start the domain controller with the following command. We will set the physical network bind address to the host configuration with the jboss.bind.address.management property. The management interface must be reachable for all hosts in the domain in order to establish a connection with the domain controller.
domain.sh -b 192.168.1.1 -Djboss.bind.address.management=192.168.1.1
(Please note the -b parameter is an alias for the -Djboss.bind.address parameter)
Slave configurations
After configuring the Master node, we will configure the Slave servers, where applications will be deployed. For this purpose we will set up two Slave Hosts. On each host we need also an installation of JBoss EAP / WildFly
On each host we need to configure the host.xml file (as an alternative you can name the host file as you like and start the domain with the the –host-config parameter. Example ./domain.sh –host-config=host-slave.xml ).
The first thing is to choose a unique name for each host in our domain to avoid name conflicts. So, configure the name “server1” on the first host.xml file:
<host name="server1" xmlns="urn:jboss:domain:1.4">
<host name="server2" xmlns="urn:jboss:domain:1.4">
Next, we need to specify that the host controllers will connect to the remote domain controller. We will not specify the actual IP address of the Domain controller but leave it as a property named jboss.domain.master.port.
Additionally, we need to specify the username which will be used to connect to the Domain controller. So let’s add the user admin1234 which we have created on the Domain controller machine.
<remote host="${jboss.domain.master.address}" port="${jboss.domain.master.port:9999}"
username="admin1234" security-realm="ManagementRealm"/>
Finally, we need to specify the Base64 password for the server identity we have included in the remote element:
<security-realm name="ManagementRealm">
<secret value="ZnJhbmsxMjMh" />
<properties path="mgmt-users.properties" relative-to="jboss.domain.config.dir"/>
<security-realm name="ApplicationRealm">
<properties path="application-users.properties" relative-to="jboss.domain.config.dir" />
<native-interface security-realm="ManagementRealm">
<socket interface="management" port="${jboss.management.native.port:9999}"/>
The last step is to add the server nodes inside the host.xml file on both hosts.
So we will configure on the first host (server1):
<server name="server-one" group="main-server-group"/>
<server name="server-two" group="main-server-group" auto-start="false">
<socket-bindings port-offset="150"/>
And on the second host (server2)
<server name="server-three" group="other-server-group"/>
<server name="server-four" group="other-server-group" auto-start="false">
<socket-bindings port-offset="150"/>
Please notice the auto-start flag indicates that the server instances will not be started automatically if the host controller is started.
For the second server a port-offset of 150 is configured to avoid port conflicts. With the port offset we can reuse the socket-binding group of the domain configuration for multiple server instances on one host.
Ok, now we are done with our configuration and we can start the first host with:
domain.sh \
  -b 192.168.0.2
   -Djboss.domain.master.address=192.168.0.1
   -Djboss.bind.address.management=192.168.0.2
and the second one with:
domain.sh \
  -b 192.168.0.3
   -Djboss.domain.master.address=192.168.0.1
   -Djboss.bind.address.management=192.168.0.3
If you look at the Domain controller console, you should notice the following output which shows that the Domain controller has started and the other slave hosts have successfully connected:
[Host Controller] 14:43:40,740 INFO [org.jboss.as.host.controller] (Controller Boot Thread) WFLYHC0023: Starting server server-two
[Host Controller] 14:43:40,763 INFO [org.jboss.as.host.controller] (server-registration-threads - 1) WFLYHC0020: Registered remote slave host server-one
14:43:41,053 INFO [org.jboss.as.process.Server:server-two.status] (ProcessController-threads - 3) WFLYPC0018: Starting process 'Server:server-two'
[Host Controller] 14:43:43,757 INFO [org.jboss.as.host.controller] (management task-1) WFLYHC0021: Server [Server:server-two] connected using connection [Channel ID 00466fa4 (inbound) of Remoting connection 2f2990bf to localhost/127.0.0.1:46062 of endpoint "master:MANAGEMENT" ]
[Host Controller] 14:43:43,867 INFO [org.jboss.as.host.controller] (server-registration-threads - 1) WFLYHC0020: Registered remote slave host server-two
[Host Controller] 14:43:43,881 INFO [org.jboss.as] (Controller Boot Thread) WFLYSRV0025: WildFly Full 20.0.0.Final (WildFly Core 12.0.1.Final) (Host Controller) started in 8551ms - Started 80 of 82 services (25 services are lazy, passive or on-demand)