Friday, May 25, 2012
Create a Self Signed Certificate in IIS 7
How to Create a Self Signed Certificate in IIS 7
SSL is an essential part of securing your IIS 7.0 site and creating a self-signed certificate in IIS 7 is much easier to do than in previous versions of IIS. SSL certificates enable the encryption of all traffic sent to and from your IIS web site, preventing others from viewing sensitive information. It uses public key cryptography to establish a secure connection. This means that anything encrypted with a public key (the SSL certificate) can only be decrypted with the private key and vice versa.When to Use an IIS Self Signed Certificate
Never use a self signed certificate on an e-commerce site or any site that transfers valuable personal information like credit cards, social security numbers, etc.An SSL certificate has multiple purposes: distributing the public key and, when signed by a trusted third-party, verifying the identity of the server so clients know they aren’t sending their information (encrypted or not) to the wrong person. A self signed certificate is a certificate that is signed by itself rather than a trusted third party. This means you can't verify that you are connecting to the right server because any attacker can create a self signed certificate and launch a man-in-the-middle attack. Because of this, you should almost never use a self signed certificate on a public IIS server that requires anonymous visitors to connect to your site. However, self signed certificates can be appropriate in certain situations:
- Self signed certificates can be used on an intranet. When clients only have to go through a local intranet to get to the server, there is virtually no chance of a man-in-the-middle attack.
- Self signed certificates can be used on an IIS development server. There is no need to spend extra cash buying a trusted certificate when you are just developing or testing an application.
- Self signed certificates can be used on personal sites with few visitors. If you have a small personal site that transfers non-critical information, there is very little incentive for someone to attack the connection.
Generate Your IIS Self Signed Certificate
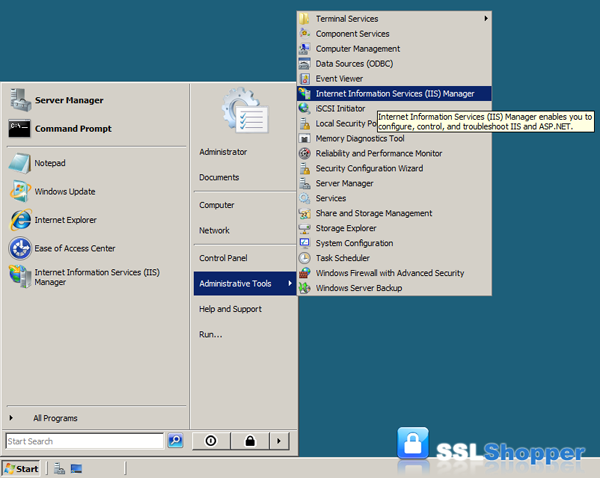
Now you know when to use an IIS self signed certificate and when not to. Now let’s create one: (Click here to hide or show the images)- Click on the Start menu, go to Administrative Tools, and click on Internet Information Services (IIS) Manager.
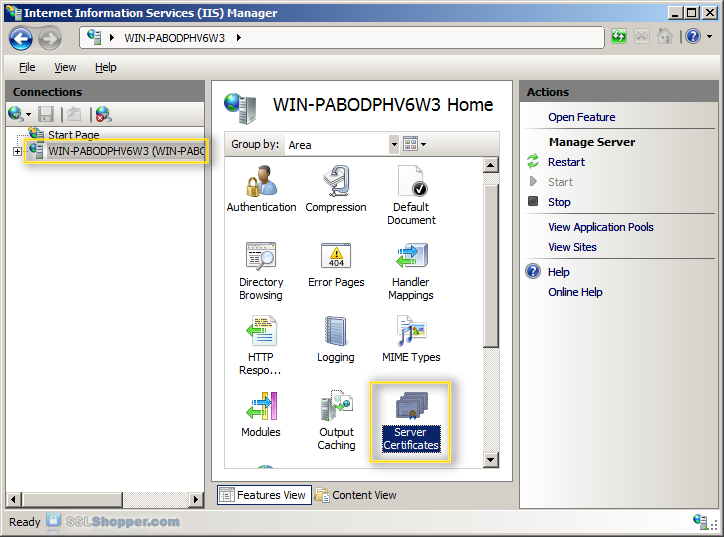
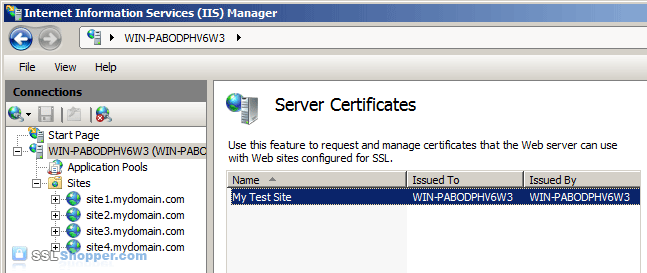
- Click on the name of the server in the Connections column on the left. Double-click on Server Certificates.
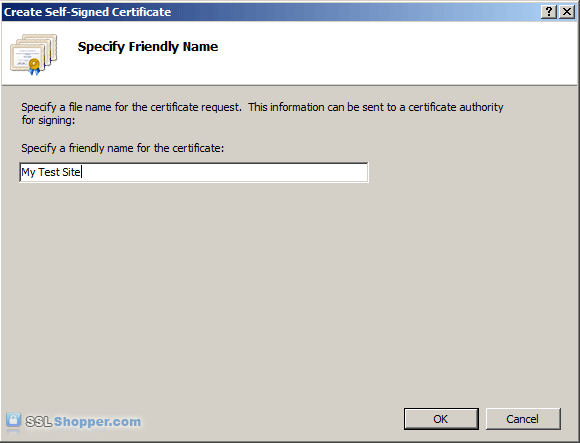
- In the Actions column on the right, click on Create Self-Signed Certificate...

- Enter any friendly name and then click OK.
- You will now have an IIS Self Signed Certificate valid for 1
year listed under Server Certificates. The certificate common name
(Issued To) is the server name. Now we just need to bind the Self signed
certificate to the IIS site.
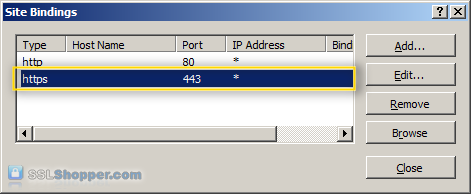
Bind the Self Signed Certificate
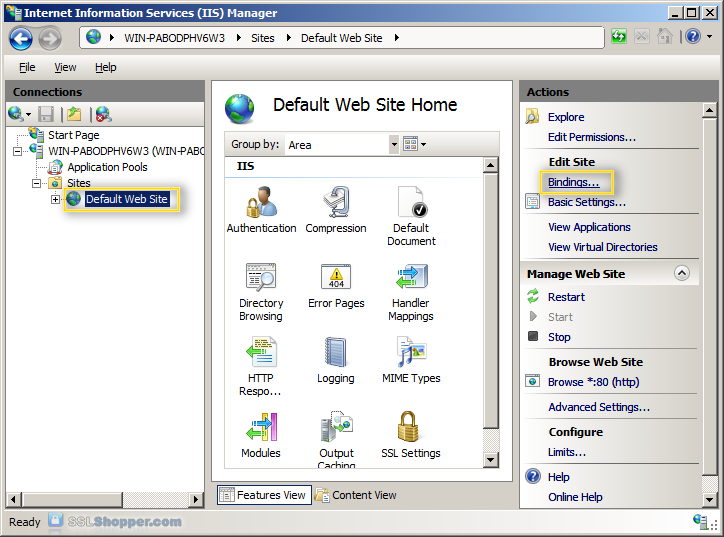
- In the Connections column on the left, expand the sites folder
and click on the website that you want to bind the certificate to. Click
on Bindings... in the right column.
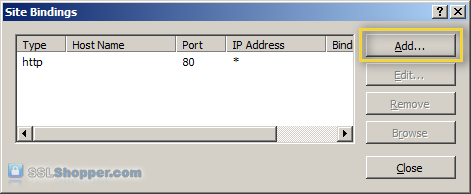
- Click on the Add... button.
- Change the Type to https and then select the SSL certificate that you just installed. Click OK.
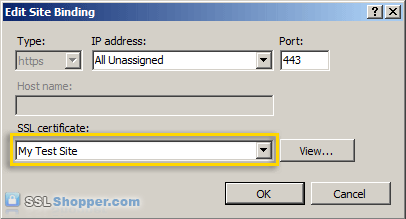
- You will now see the binding for port 443 listed. Click Close.
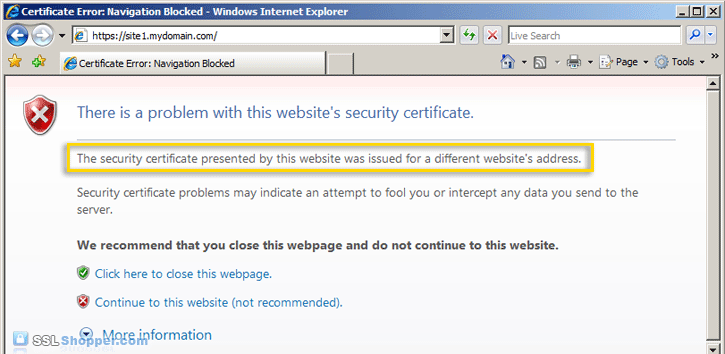
- Now let's test the IIS self signed certificate by going to the
site with https in our browser (e.g. https://site1.mydomain.com). When
you do, you should see the following warning stating that "The security
certificate presented by this website was issued for a different
website's address" (a name mismatch error).
This is displayed because IIS always uses the server's name (in this case WIN-PABODPHV6W3) as the common name when it creates a self signed certificate. This typically doesn't match the hostname that you use to access the site in your browser (site1.mydomain.com). For many situations where IIS self signed certificates are used, this isn't a problem. Just click "Continue to this web site" each time. However, if you want to completely get rid of the error messages, you'll need to follow the next two steps below.
Generate a Self Signed Certificate with the Correct Common Name
This step is only required if you want to get rid of the warning message displayed because the common name on the self signed certificate doesn't match the website's hostname. In order to resolve this problem, we'll need to create the self signed certificate using the same method that is used to create a self signed certificate in IIS 6.0 (with SelfSSL instead of through IIS).- Download the Internet Information Services (IIS) 6.0 Resource Kit Tools
and install SelfSSL 1.0 (if you do a Custom install you can uncheck
everything except for SelfSSL). Once it is installed, click on the Start
menu, go to IIS Resources, then SelfSSL, and run SelfSSL.

- Paste in the following command and replace site1.mydomain.com
with the hostname of your IIS site. If you receive the erorr "Error
opening metabase: 0x80040154", just ignore it. We will be manually
binding the certificate to the website.
SelfSSL /N:CN=site1.mydomain.com /V:1000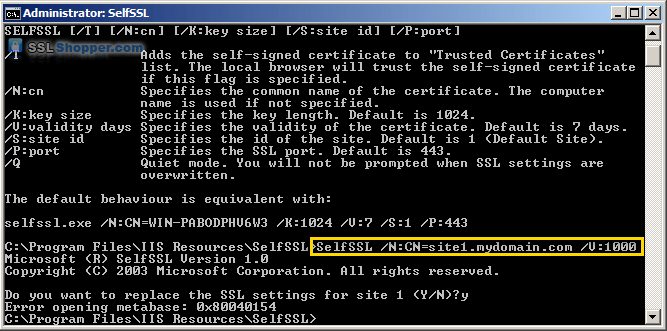
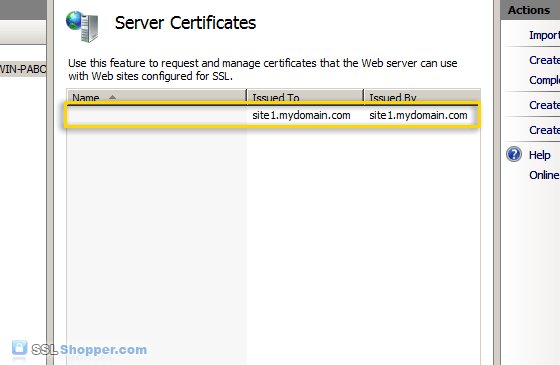
- After the command is finished, you will have an IIS self signed
certificate with the correct common name listed in the Server
Certificates section of IIS. Now follow the instructions above to bind the certificate to your IIS website.
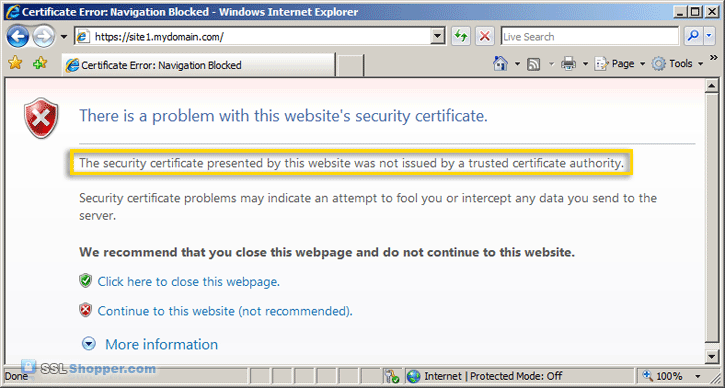
- After you have bound the new certificate to your IIS site, visit
it with https in your web browser and you will encounter another error:
"The security certificate presented by this website was not issued by a
trusted certificate authority." (the SSL Certificate Not Trusted error)
Don't worry; this is the last error we will need to fix. This is a normal error for self signed certificates because the certificate is signed by itself instead of a trusted SSL provider. All visitors to the site will see that error unless they import the self-signed certificate into their Trusted Root Certification Authorities store (or the appropriate SSL certificate store for the browser they are using). You can easily add the IIS self signed certificate to the store on the server by following the the instructions below. If you need to import the certificate on another Windows machine, just follow the instructions on how to Move or copy an SSL certificate from a Windows server.
Add the Self Signed Certificate to Trusted Root Certificate Authorities
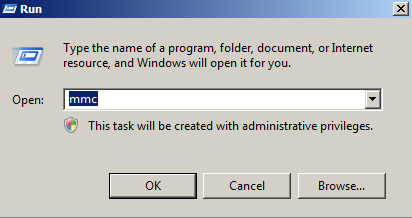
- Click on the Start menu and click Run.
- Type in mmc and click OK.
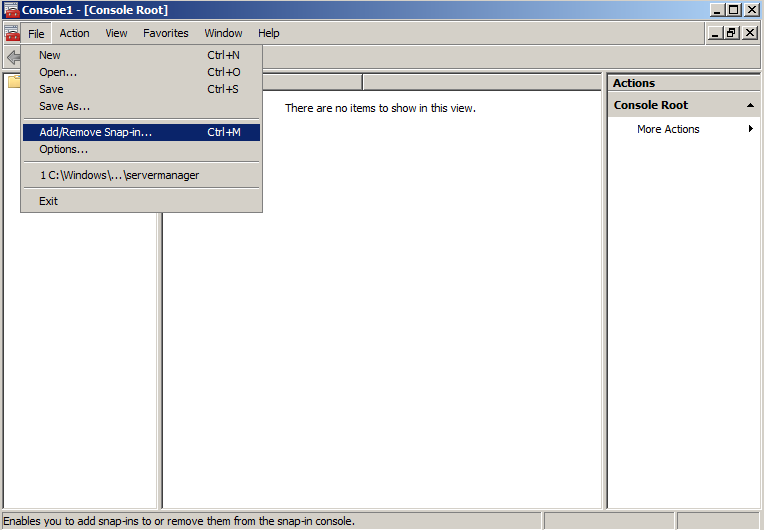
- Click on the File menu and click Add/Remove Snap-in...
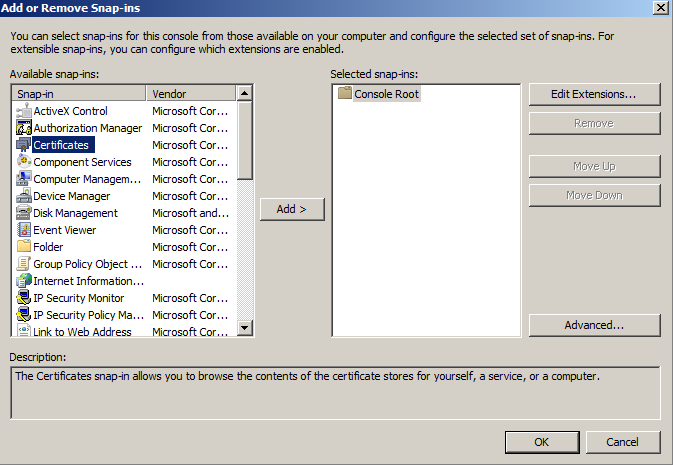
- Double-click on Certificates.
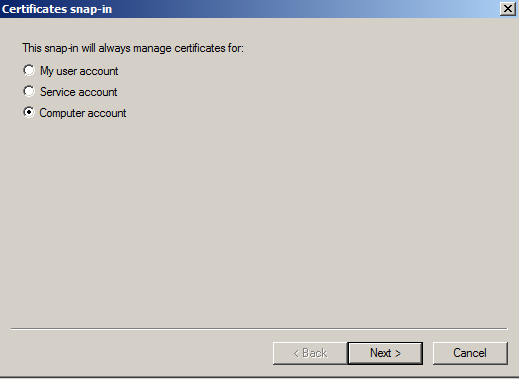
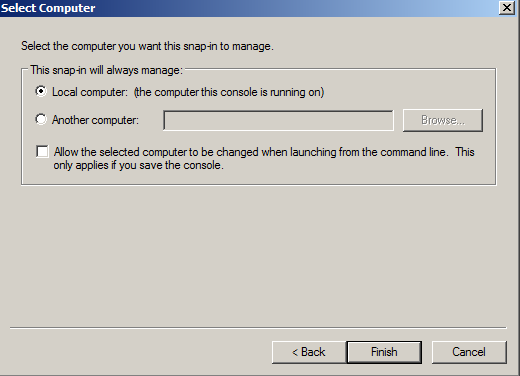
- Click on Computer Account and click Next.
- Leave Local Computer selected and click Finish.
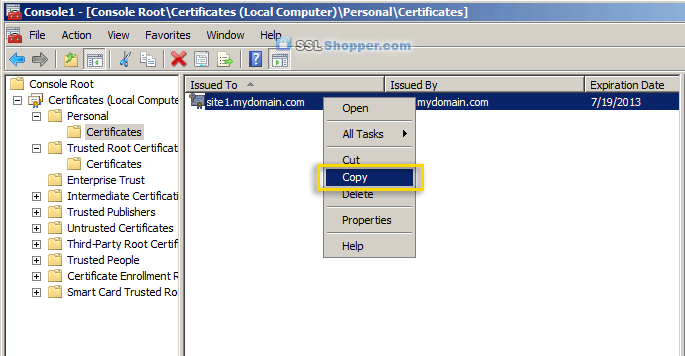
- Expand the Certificates item on the left and expand the Personal
folder. Click on the Certificates folder and right-click on the self
signed certificate that you just created and select Copy.
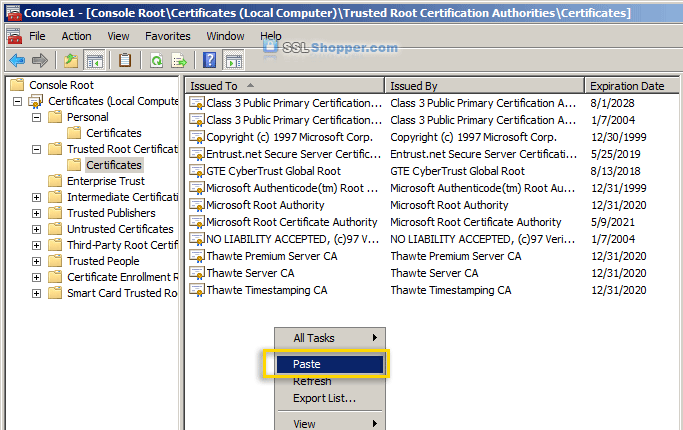
- Expand the Trusted Root Certification Authorities folder and
click the Certificates folder underneath it. Right-click in the white
area below the certificates and click Paste.
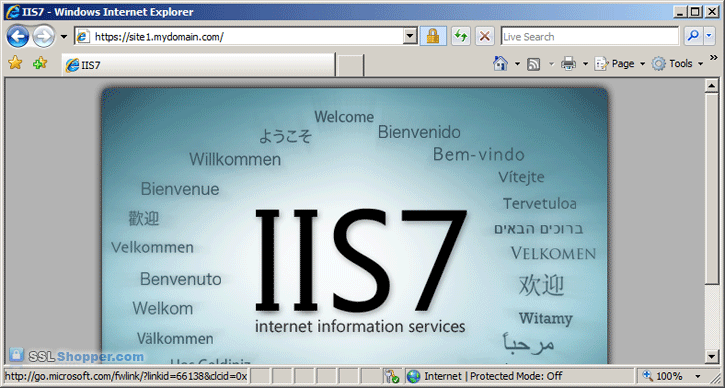
- Now you can visit your site with https in your web browser and
you shouldn't receive any errors because Windows will now automatically
trust your IIS self signed certificate.
- Installing an SSL Certificate in Windows Server 2008 (IIS 7.0)
- Tip/Trick: Enabling SSL on IIS 7.0 Using Self-Signed Certificates
- IIS Self Signed Certificates on IIS 7 – the Easy Way and the Most Effective Way
Bryan Bowers
Posts: 15
Posts: 15
Reply #16 on : Mon April 30, 2012, 15:35:16
Robert
Posts: 2
Posts: 2
Reply #15 on : Fri April 27, 2012, 07:25:20
Rix
Posts: 15
Posts: 15
Reply #14 on : Fri April 27, 2012, 00:49:29
Ted
Posts: 15
Posts: 15
Reply #13 on : Fri January 20, 2012, 16:07:51
Mithun Kanji
Posts: 15
Posts: 15
Reply #12 on : Mon January 16, 2012, 04:32:11
Jeff
Posts: 15
Posts: 15
Reply #11 on : Mon December 12, 2011, 17:45:38
Robert
Posts: 2
Posts: 2
Reply #10 on : Fri December 09, 2011, 06:39:09
Mo
Posts: 15
Posts: 15
Reply #9 on : Mon November 28, 2011, 09:29:32
Mo
Posts: 15
Posts: 15
Reply #8 on : Mon November 28, 2011, 09:24:31
DPK
Posts: 15
Posts: 15
Reply #7 on : Fri November 18, 2011, 00:56:32
Amy Hsu
Posts: 15
Posts: 15
Reply #6 on : Thu September 29, 2011, 15:14:51
Anthony Garrett
Posts: 15
Posts: 15
Reply #5 on : Mon June 20, 2011, 12:46:52
Nicogis
Posts: 15
Posts: 15
Reply #4 on : Tue April 12, 2011, 11:01:02
Nelson
Posts: 15
Posts: 15
Reply #3 on : Thu April 07, 2011, 09:49:21
Eugene Honor
Posts: 15
Posts: 15
Reply #2 on : Fri April 01, 2011, 08:30:27
Clive Nicholson
Posts: 15
Posts: 15
Reply #1 on : Mon February 14, 2011, 06:10:57
Thursday, May 24, 2012
create trusted login provider
Claims Walkthrough: Creating Trusted Login Providers (SAML Sign-in) for SharePoint 2010
SharePoint 2010
Published: August 2010
Summary: Learn how to create a custom security token service (STS) and then set up a trust relationship between a SharePoint 2010 farm and the custom STS.
Applies to: Microsoft SharePoint Foundation 2010 | Microsoft SharePoint Server 2010
Provided by: Andy Li, Microsoft Corporation
Contents
 1 Download code: Claims Example Trusted Login Provider1
Summary: Learn how to create a custom security token service (STS) and then set up a trust relationship between a SharePoint 2010 farm and the custom STS.
Applies to: Microsoft SharePoint Foundation 2010 | Microsoft SharePoint Server 2010
Provided by: Andy Li, Microsoft Corporation
Contents
-
Purpose of a Trusted Login Provider
-
Scenario: Enabling Access to a SharePoint Site Hosted on an Extranet
-
Step 1: Creating the WingtipSTS Project
-
Step 2: Testing theWingtipSTS Project Claims
-
Step 3: Defining the Claims Supported by the WingtipSTS Project
-
Step 4: Setting Up Trust in SharePoint
-
Step 5: Creating a Web Application That Uses the WingtipSTS Project
-
Step 6: Testing the WingtipSTS Project Authentication
-
Conclusion
-
Additional Resources
1 Download code: Claims Example Trusted Login Provider1Purpose of a Trusted Login Provider
In this walkthrough, you create a custom security token
service (STS) and then set up a trust relationship between a Microsoft
SharePoint 2010 farm and the custom STS. The custom STS serves as the
authentication provider. When users log on to the SharePoint site, they
are first redirected to the logon page of the custom STS. They are
redirected back to SharePoint after the authentication.
 Note:
Note:
|
|---|
|
A trusted login provider is an external (that is,
external to SharePoint) STS that SharePoint trusts. For definitions of
claims terms, see Claims-Based Identity Term Definitions2. SAML passive sign-in describes the process of signing in. When a sign-in for a web application is configured to accept tokens from a trusted login provider, this type of sign-in is called SAML passive sign-in. For more information, see Incoming Claims: Signing into SharePoint3. |
Scenario: Enabling Access to a SharePoint Site Hosted on an Extranet
The fictitious company Contoso has a SharePoint site hosted
on an extranet, which its employees can log on to remotely from home or
during business travel. Contoso has a partner company named Wingtip,
whose employees are working on a project with Contoso and who need to
access documents from the SharePoint site.
To enable the Wingtip employees to log on to the SharePoint site that is hosted by Contoso, Wingtip created an STS that can be used to authenticate its employees. On the Contoso site, the farm administrator set up the trust relationship between the SharePoint farm and Wingtip's STS. When employees from Wingtip try to log on to the Contoso SharePoint site, they are first redirected to their STS to be authenticated, then the STS redirects the user to the Contoso SharePoint site. Because the SharePoint farm trusts the Wingtip STS, it also trusts the security token that is issued by the Wingtip STS.
To enable the Wingtip employees to log on to the SharePoint site that is hosted by Contoso, Wingtip created an STS that can be used to authenticate its employees. On the Contoso site, the farm administrator set up the trust relationship between the SharePoint farm and Wingtip's STS. When employees from Wingtip try to log on to the Contoso SharePoint site, they are first redirected to their STS to be authenticated, then the STS redirects the user to the Contoso SharePoint site. Because the SharePoint farm trusts the Wingtip STS, it also trusts the security token that is issued by the Wingtip STS.
Step 1: Creating the WingtipSTS Project
-
Start Visual Studio 2010.
-
On the File menu, click New Project.
-
In the New Project dialog box, do the following:
-
In the left pane, select Other Project Type, click Visual Studio Solution, and then select Blank Solution on the right, as shown in Figure 1.
-
For Location, type C:\StudentFiles\LabFiles\Module_6\Lab.
-
For the solution Name, type TrustedLogin.
Figure 1. New Project dialog box in Visual Studio

-
In the left pane, select Other Project Type, click Visual Studio Solution, and then select Blank Solution on the right, as shown in Figure 1.
-
In Solution Explorer, right-click the TrustedLogin solution, click Add, and then click New Web Site.
-
In the Add New Web Site dialog box, do the following:
-
Select the ASP.NET Security Token Service Web Site template.
-
Change Web Location to File System, and the value to C:\StudentFiles\LabFiles\Module_6\Lab\TrustedLogin\WingtipSTS.
Figure 2. Add New Web Site dialog box in Visual Studio

-
Select the ASP.NET Security Token Service Web Site template.
-
Open the web.config file under the new website. In the appSettings section, change IssuerName to WingtipSTS.
Figure 3. Change appSettings

Note:
The SigningCertificateName (CN=STSTestCert) is the certificate that is used by WingtipSTS to sign the security token.
-
Click Start, and then click Run.
-
Type mmc, and then press Enter.
-
In the Microsoft Management Console, click File, and then click Add/Remove Snap-in.
-
Under the Available snap-ins field in the left pane, click Certificates, and then click Add.
Figure 4. Microsoft Management Console displaying the STSTestCert

-
In the Certificate snap-in dialog box, click Computer Account, click Next, and then select Local Computer.
-
Click Finish, and then click OK.
Note:
Notice that the SigningCertificate in web.config points to the certificate that is displayed here as STSTestCert.
-
When setting up the trust between WingtipSTS and SharePoint, we need to tell SharePoint the certificate that is used by WingtipSTS. To do this:
-
Right-click STSTestCert, select All Tasks, and then click Export.
-
Click Next. Notice that you can export only the public key from this certificate.
-
Click Next, and then select DER encoded binary X.509 (.CER).
-
Click Next. In the File to Export dialog box, type C:\StudentFiles\LabFiles\Module_6\Resources\STSTestCertPub.cert as the file name.
-
Click Next, and then click Finish.
-
Right-click STSTestCert, select All Tasks, and then click Export.
-
Close Microsoft Management Console.
Step 2: Testing theWingtipSTS Project Claims
-
Right-click the TrustedLogin solution, click Add, and then click New Web Site.
-
In the Add New Web Site dialog box, select Claim-Aware ASP.NET Web Site template. Set Web Location to File System and Value to C:\StudentFiles\LabFiles\Module_6\Lab\TestRPWeb, as shown in Figure 5.
Figure 5. Add New Web Site dialog box

-
Right-click the TestRPWeb project, and then click Add STS Reference.
-
In the Federation Utility wizard that opens, on the Welcome to the Federation Utility wizard page (see Figure 6), click Next. When prompted with The application is NOT hosted on a secure https connection, click Yes.
Figure 6. Welcome to the Federation Utility wizard page

-
On the Security Token Service page, click Use an existing STS option. Type http://localhost:48924/WingtipSTS/FederationMetadata/2007-06/FederationMetadata.xml as the STS WS-Federation metadata document location, as shown in Figure 7.
Note:
This URL might be different in your environment. To find the correct URL, right-click FederationMetadata.xml under the FederationMetadata/2007-06 folder in your WingtipSTS project.
Figure 7. Security Token Services page with STS option

-
Click Next, and then click Yes regarding the non-secure connection.
-
On the Security token encryption page, click No Encryption, as shown in Figure 8.
Figure 8. Security token encryption page

-
On the Offered Claims page, click Next, as shown in Figure 9.
Note:
This dialog box does not list the claim types that you defined; this is okay.
Figure 9. Claims offered on the Offered claims page

-
In the Summary dialog box, click Finish.
Note:
The previous steps will add the necessary entries in the web.config file of WingtipSTS project so that the website will redirect the user to the WingtipSTS site to authenticate the user and to obtain the user's claims.
-
Open the web.config file.
-
Remove
requestValidationMode="2.0"from the <httpRuntime> element.
-
Compile the TestRPWeb project and correct any compile errors.
-
Under TestRPWeb, right-click Default.aspx, and then select View in Browser. You should be redirected to the logon page of the WingtipSTS site, as shown in Figure 10.
Note:
If you get a page cannot be displayed error, ensure that WingtipSTS is up and running in Visual Studio Web Development.
Figure 10. WingtipSTS logon page

-
Type the following credentials:
-
Username: user1@wingtip.com
-
Password: pass@word1 (We do not verify the password; any password will work.)
-
Username: user1@wingtip.com
-
Click Submit. You are redirected back to the TestRPWeb site. Default.aspx displays all claims that are returned by WingtipSTS.
Figure 11. Claims returned by WingtipSTS

Troubleshooting a Redirection Error
You may receive the following error when WingtipSTS redirects you back to TestRPWeb:
ID4175: The issuer of the Security Token was not recognized by the IssuerNameRegistry. To accept Security Tokens from this issuer, configure the IssuerNameRegistry to return a valid name for this issuer.
If you receive this error, verify that the thumbprint value of the STSTestCert in the web.config file, under TestRPWeb, is correct.
To verify this, open the Certificate MMC and find the thumbprint on the Details tab of the certificate, as shown in Figure 12.
Figure 12. Certificate dialog box showing thumbprint

ID4175: The issuer of the Security Token was not recognized by the IssuerNameRegistry. To accept Security Tokens from this issuer, configure the IssuerNameRegistry to return a valid name for this issuer.
If you receive this error, verify that the thumbprint value of the STSTestCert in the web.config file, under TestRPWeb, is correct.
<issuerNameRegistry
  type="Microsoft.IdentityModel.Tokens.ConfigurationBasedIssuerNameRegistry,
  Microsoft.IdentityModel, Version=3.5.0.0, Culture=neutral,
  PublicKeyToken=31bf3856ad364e35">
  <trustedIssuers>
      <add thumbprint="99fcfe2c70ebb571020ca8aa1b7633dfe1fa1d58" name="http://localhost:48924/WingtipSTS/" />
  </trustedIssuers>
</issuerNameRegistry>
Figure 12. Certificate dialog box showing thumbprint
Step 3: Defining the Claims Supported by the WingtipSTS Project
-
Add a class file named UserInfo.cs to the App_Code folder under the WingtipSTS Web Site project.
-
Add the following using statement to UserInfo.cs.
using Microsoft.IdentityModel.Claims; -
Add the following code at the end of the UserInfo.cs file. The WingtipClaimTypes class defines the claims that are supported by WingtipSTS.
public class WingtipClaimTypes
{
    // System.IdentityModel.Claims.ClaimTypes.Email;
    public static string EmailAddress = "http://schemas.xmlsoap.org/ws/2005/05/identity/claims/emailaddress";
    public static string Title = "http://schemas.wingtip.com/sharepoint/2009/08/claims/title";
}
-
Replace the UserInfo class with the following code. This class contains some utility methods that are used by WingtipSTS to retrieve a user's claims and authenticate the user based on the user's credentials.
Note:
This code is only for demonstration purposes. You should not use it in a production environment.
public class UserInfo
{
    // The email address is used as the UserID.
    // Every user has two claims: title and email address.
    // SharePoint will pick up the email claim and treat it as the identity.
    private static string[] userDB =
       {
        "user1@wingtip.com:Title:Engineer",
        "user1@wingtip.com:Email:user1@wingtip.com",
        "user2@wingtip.com:Title:Manager",
        "user2@wingtip.com:Email:user2@wingtip.com",
        "user3@wingtip.com:Title:CEO",
        "user3@wingtip.com:Email:user3@wingtip.com",
       };

    // Manually construct a list of users. In a production environment,
    // you should look up a directory service or database
    // to retrieve the user information.
    public static List<string> GetAllUsers()
    {
        List<string> allUsers = new List<string>();
        // Adding forms-based users.
        allUsers.Add("user1@wingtip.com");
        allUsers.Add("user2@wingtip.com");
        allUsers.Add("user3@wingtip.com");
        return allUsers;
    }

    public static bool AuthenticateUser(string username, string password)
    {
        // Add your authentication logic here.
        return true;
    }

    /// <summary>
    /// A real implementation should look up a directory service or database
    /// to retrieve a user's claim. The code below is
    /// used only for demonstration purposes.
    /// </summary>
    /// <param name="username"></param>
    /// <returns></returns>
    public static List<Claim> GetClaimsForUser(string username)
    {
        List<Claim> userClaims = new List<Claim>();
        foreach (string userInfo in userDB)
        {
            string[] claims = userInfo.Split(new string[] { ":" }, StringSplitOptions.RemoveEmptyEntries);
            if (username == claims[0])
            {
                userClaims.Add(new Claim(GetClaimTypeForRole(claims[1]), claims[2],
            Microsoft.IdentityModel.Claims.ClaimValueTypes.String));
            }
        }

        return userClaims;
    }

    public static string GetClaimTypeForRole(string roleName)
    {
        if (roleName.Equals("Title", StringComparison.OrdinalIgnoreCase))
            return WingtipClaimTypes.Title;
        else if (roleName.Equals("Email", StringComparison.OrdinalIgnoreCase))
            return WingtipClaimTypes.EmailAddress;
        else
            throw new Exception("Claim Type not found!");
    }

}
-
The code in the UserInfo.cs file now looks like the following.
using System;
using System.Collections.Generic;
using System.Linq;
using System.Web;
using Microsoft.IdentityModel.Claims;

public class WingtipClaimTypes
{
    // System.IdentityModel.Claims.ClaimTypes.Email;
    public static string EmailAddress =
            "http://schemas.xmlsoap.org/ws/2005/05/identity/claims/emailaddress";
    public static string Title = "http://schemas.wingtip.com/sharepoint/2009/08/claims/title";
}

public class UserInfo
{
    // The email address is used as the UserID.
    // Every user has two claims: title and email address.
    // SharePoint will pick up the email claim and treat it as identity.
    private static string[] userDB =
       {
        "user1@wingtip.com:Title:Engineer",
        "user1@wingtip.com:Email:user1@wingtip.com",
        "user2@wingtip.com:Title:Manager",
        "user2@wingtip.com:Email:user2@wingtip.com",
        "user3@wingtip.com:Title:CEO",
        "user3@wingtip.com:Email:user3@wingtip.com",
       };

    // Manually construct a list of users. In a production environment,
    // you should look up a directory service or database to retrieve
    // the user information.
    public static List<string> GetAllUsers()
    {
        List<string> allUsers = new List<string>();
        //Adding forms-based users.
        allUsers.Add("user1@wingtip.com");
        allUsers.Add("user2@wingtip.com");
        allUsers.Add("user3@wingtip.com");
        return allUsers;
    }

    public static bool AuthenticateUser(string username, string password)
    {
        // Add your authentication logic here.
        return true;
    }

    /// <summary>
    /// A real implementation should look up a directory service or database
    /// to retrieve a user's claim. The code below is used
    /// only for demonstration purposes.
    /// </summary>
    /// <param name="username"></param>
    /// <returns></returns>
    public static List<Claim> GetClaimsForUser(string username)
    {
        List<Claim> userClaims = new List<Claim>();
        foreach (string userInfo in userDB)
        {
            string[] claims = userInfo.Split(new string[] { ":" },
            StringSplitOptions.RemoveEmptyEntries);
            if (username == claims[0])
            {
                userClaims.Add(new Claim(GetClaimTypeForRole(claims[1]), claims[2],
                Microsoft.IdentityModel.Claims.ClaimValueTypes.String));
            }
        }

        return userClaims;
    }

    public static string GetClaimTypeForRole(string roleName)
    {
        if (roleName.Equals("Title", StringComparison.OrdinalIgnoreCase))
            return WingtipClaimTypes.Title;
        else if (roleName.Equals("Email", StringComparison.OrdinalIgnoreCase))
            return WingtipClaimTypes.EmailAddress;
        else
            throw new Exception("Claim Type not found!");
    }

}
-
Under App_Code, double-click CustomSecurityTokenService.cs to open the file.
-
Add the namespace reference to System.Collections.
-
Replace the GetOutputClaimsIdentity function with the following code. This is the function that returns the user's claim.
    protected override IClaimsIdentity GetOutputClaimsIdentity( IClaimsPrincipal principal,
         RequestSecurityToken request, Scope scope )
    {
        if ( null == principal )
        {
            throw new ArgumentNullException( "principal" );
        }

        ClaimsIdentity outputIdentity = new ClaimsIdentity();

        // Issue custom claims.
        // TODO: Change the claims below to issue custom claims
        // that are required by your application.
        // Update the application's configuration file to reflect
        // the new claims requirements.

        // outputIdentity.Claims.Add( new Claim(
            System.IdentityModel.Claims.ClaimTypes.Name, principal.Identity.Name ) );
        // outputIdentity.Claims.Add( new Claim( ClaimTypes.Role, "Manager" ) );

        // The Wingtip implementation.
        string username = principal.Identity.Name;
        List<Claim> claims = UserInfo.GetClaimsForUser(username);

        foreach (Claim claim in claims)
        {
            outputIdentity.Claims.Add(claim);
        }

        return outputIdentity;
    }
-
Compile the WingtipSTS website, and then correct any compile errors.
Step 4: Setting Up Trust in SharePoint
The process of setting up trust between WingtipSTS and SharePoint is basically to register the WingtipSTS as a SPTrustedLoginProvider object in the SharePoint farm.
-
On the Central Administration site, on the left navigation pane, click Security.
-
Under General Security, click Manage Trust.
-
On the Server ribbon, click New.
-
In the Establish Trust Relationship dialog box, in the Name text box, type STSTestCert so that it will be displayed as shown in Figure 13.
Figure 13. Establishing trust relationship in Central Administration

-
Click Browse, and then locate the STSTestCertPub.cer file that you exported earlier.
-
Click OK.
Note:
Step 4 enables SharePoint to trust all the certificates that are rooted to the STSTestCert certificate.
-
Add a WinForm project named RegisterSTS to the TrustedLogin solution.
Note:
Ensure that you change the Platform Target to All CPU and .NET Framework to 3.5.
-
Right-click the RegisterSTS project, and then click Set as Startup Project.
-
Add a button to the form and change the Text property of the button to Register WingtipSTS.
-
Double-click the button. This brings you to the event handler function of the button.
-
Replace the Button1_Click function with the following code. The code creates a SPTrustedLoginProvider object and adds it to the SPSecurityTokenServiceManager.TrustedLoginProviders collection.
The code does the following:
Note:
You can also use Windows PowerShell scripts to register an STS with SharePoint. For more information, see Security Cmdlets (SharePoint Foundation 2010)4.
-
Define the claims that will be recognized by SharePoint (in this example, email and title).
-
idClaim defines which claim type is used to uniquely identify a user.
-
The AddKnownClaimValue function of the SPTrustedClaimTypeInformation
class adds the known claim values to the claim type so that later on,
when you do a claim search in the People Picker, you will be able to
find them.
-
An X509Certificate2 object points to the public key that we exported earlier.
You can create a custom SPClaimProvider object for your SPTrustedLoginProvider object and register it by using SPTrustedLoginProvider.ClaimProviderName (commented out in the following code). Otherwise, SharePoint automatically creates an SPTrustdClaimProvider object (derived from the SPClaimProvider class) for this SPTrustedLoginProvider object. This SPTrustdClaimProvider object is based on the claim type information that we provided in the registration code. Warning:
Do not forget the default.aspx in the URL.
https://intranet.contoso.com/_trust/ is the redirect URL after the user is authenticated by the STS.
       private void button1_Click(object sender, EventArgs e)
        {
            List<SPTrustedClaimTypeInformation> claimMapping = new List<SPTrustedClaimTypeInformation>();
            List<string> strClaimMapping = new List<string>();

            SPTrustedClaimTypeInformation idClaim = new SPTrustedClaimTypeInformation("EmailAddress",
            "http://schemas.xmlsoap.org/ws/2005/05/identity/claims/emailaddress",
            "http://schemas.xmlsoap.org/ws/2005/05/identity/claims/emailaddress");
            SPTrustedClaimTypeInformation titleClaim = new SPTrustedClaimTypeInformation("Title",
            "http://schemas.wingtip.com/sharepoint/2009/08/claims/title",
            "http://schemas.wingtip.com/sharepoint/2009/08/claims/title");

            titleClaim.AcceptOnlyKnownClaimValues = true;

            idClaim.AddKnownClaimValue("user1@wingtip.com");
            idClaim.AddKnownClaimValue("user2@wingtip.com");
            idClaim.AddKnownClaimValue("user3@wingtip.com");

            titleClaim.AddKnownClaimValue("Engineer");
            titleClaim.AddKnownClaimValue("Manager");
            titleClaim.AddKnownClaimValue("CEO");

            // Create the string[] for all claims. This is required for
            // the construction of the SPTrustedLoginProvider object.
            strClaimMapping.Add(idClaim.InputClaimType);
            strClaimMapping.Add(titleClaim.InputClaimType);


            X509Certificate2 ImportTrustCertificate =
            new X509Certificate2(@"C:\StudentFiles\LabFiles\Module_6\Resources\STSTestCertPub.cer");

            claimMapping.Add(idClaim);
            claimMapping.Add(titleClaim);

            SPSecurityTokenServiceManager manager = SPSecurityTokenServiceManager.Local;
            SPTrustedLoginProvider provider = new SPTrustedLoginProvider(manager,
            "WingtipSTS","WingtipSTS",new Uri("http://localhost:48924/WingtipSTS/default.aspx"),
            "https://intranet.contoso.com/_trust/", strClaimMapping.ToArray(),idClaim);

            foreach (SPTrustedClaimTypeInformation claimTypeInfo in claimMapping)
            {
                if (claimTypeInfo.InputClaimType == provider.IdentityClaimTypeInformation.InputClaimType)
                {
                    continue;
                }
                provider.AddClaimTypeInformation(claimTypeInfo);
            }

            if (ImportTrustCertificate != null)
            {
                provider.SigningCertificate = ImportTrustCertificate;
            }


            //provider.ClaimProviderName = "ContosoCRMClaimProvider";

            provider.UseWReplyParameter = true;

            manager.TrustedLoginProviders.Add(provider);
            manager.Update();
        }
-
Define the claims that will be recognized by SharePoint (in this example, email and title).
-
Build the RegisterSTS project, and then run it.
-
Click the button to register the trusted login provider to the farm.
Step 5: Creating a Web Application That Uses the WingtipSTS Project
-
Browse to the SharePoint 2010 Central Administration page.
-
In the Application Management section, click Manage web applications.
-
On the ribbon, click New.
-
In the Create New Web Application dialog box, under Authentication, click Claims Based Authentication.
-
In the IIS Web Site section, under Create a new IIS web site, change the Name field to SharePoint – Trusted.
-
Change the Port number to 443.
-
In the Security Configuration section, under Use Security Socket layer (SSL), click Yes, as shown in Figure 14.
-
In the Claims Authentication Types section, do the following:
-
Click Enable Windows Authentication.
-
Click Integrated Windows Authentication.
-
Click NTLM from the drop-down list.
-
Click Trusted Identity Provider.
-
Click WingtipSTS.
Figure 14. Create New Web Application dialog box

-
Click Enable Windows Authentication.
-
Under Application Pool, select the existing AppPool : SharePointAppPool.
-
In the Database Name and Authentication section, change the database name to WSS_Content_443. Leave other settings as their defaults.
-
Click OK to create the web application.
-
After the SSL web application is created, click Application Management, and then click Create site collection.
-
Change the web application to https://intranet.contoso.com.
-
For the title, type Trusted.
-
Click Browse on the Primary Site Collection Administrator.
-
On the People Picker, under WingtipSTS, do the following:
Note:
As mentioned earlier, the WingtipSTS Claim Provider is a type of SPTrustedClaimProvder. It is generated automatically by SharePoint when registering the SPTrustedLoginProvider.
-
Select EmailAddress. It shows that there are three available choices, as shown in Figure 15.
-
Select user1@wingtip.com, and then click OK.
Figure 15. People Picker

-
Select EmailAddress. It shows that there are three available choices, as shown in Figure 15.
-
Click OK to create the site collection.
Step 6: Testing the WingtipSTS Project Authentication
 Important:
|
|---|
|
Before you run this test, ensure that you have the WingtipSTS project up and running. You can either right-click the WingtipSTS project and then click View in Browser, or you can deploy it to an Internet Information Services (IIS) website. |
-
Navigate to https://intranet.contoso.com.
-
In the Multiple Authentication Selector drop-down list, click WingtipSTS, as shown in Figure 16.
Figure 16. Selecting WingtipSTS from the drop-down list

You are redirected to the logon page of the WingtipSTS website, as shown in Figure 17.
Figure 17. Logon page of the WingtipSTS website

-
Type the credential for site administrator, which is user1@wingtip.com.
-
After authentication, you are redirected back to the SharePoint site, as shown in Figure 18.
Figure 18. Redirected back to the SharePoint site after authentication

-
Deploy a Web Part that you created and add it to the home page. Observe and make a note of what claims are added to the user.
-
On the Site Actions menu, click Site Settings, and then click Users and Groups. Click user1@wingtip.com, and then look for the account name. Note the answer to the following questions:
-
What are the ClaimTypes for user1@wingtip.com?
-
What is the account name for user1@wingtip.com?
-
What does each character in the account name mean? (Decode the account name manually or by using code.)
-
What are the ClaimTypes for user1@wingtip.com?
-
On the ribbon, under Site Actions, select Site Permissions, and then click Grant Permissions. Click the Browse icon to open the People Picker dialog box.
-
Under WingtipSTS, click Title.
-
Type Manager, and then click Search.
-
From the search result, double-click Manager to add the "Manager" to the users list, and then click Add, as shown in Figure 19.
Figure 19. People Picker displaying WingtipSTS employee titles

-
Close all Internet Explorer instances to clean up the claims authentication session cookie.
-
Open a new instance of Internet Explorer and navigate to https://intranet.contoso.com.
-
Try to log on as user2@wingtip.com. Are you able to log on? What if you use user3@wingtip.com?
Conclusion
In this walkthrough, you learn how to create a custom
security token service (STS) and then set up the trust relationship
between a SharePoint farm and the custom STS. The custom STS serves as
the authentication provider. When users log on to the SharePoint site,
they are first redirected to the logon page of the custom STS, and then
they are redirected back to SharePoint after the authentication.
Additional Resources
For more information, see the following resources:
-
Steve Peschka's Blog: Share-n-dipity5
-
Security Resource Center | SharePoint 20106
-
Security Cmdlets (SharePoint Foundation 2010)4
-
Security Blogs, Resource Centers, Code Samples, and SharePoint Forums7
-
Claims Walkthrough: Writing Claims Providers for SharePoint 20108
-
Claims Tips 1: Learning About Claims-Based Authentication in SharePoint 20109
-
Claims Tips 2: Learning About Claims-Based Authentication in SharePoint 201010
-
Claims Walkthrough: Creating Claims Providers for Forms-Based Authentication Web Applications for SharePoint 201011
-
Claims Walkthrough: Creating Claims Providers for Trusted Login Providers for SharePoint 201012
-
Claims
Walkthrough: Creating Forms-Based Authentication for Claims-Based
SharePoint 2010 Web Applications Using ASP.NET SQL Membership and Role
Providers13
-
Claims
Walkthrough: Creating Forms-Based Authentication for Claims-Based
SharePoint 2010 Web Applications Using Custom Membership and Role
Providers14
-
Claims Provider in SharePoint 201015
-
Incoming Claims: Signing into SharePoint3
-
Claims-Based Identity Term Definitions2
-
Microsoft.SharePoint.Administration.Claims16
-
Planning, Upgrade, Migration, Administration, Configuration, and Setup for SharePoint 201017
-
Security in SharePoint 2010 Video Presentations18
-
SharePoint 2010 Advanced Developer Training19
-
SharePoint Developer Center20
Change History
| Date | Description |
|---|---|
|
August 2010 |
Initial publication |
Links Table
1http://code.msdn.microsoft.com/SharePoint-2010-Creating-c30588a7
2http://msdn.microsoft.com/en-us/library/ee534975.aspx
3http://msdn.microsoft.com/en-us/library/ee534967.aspx
4http://technet.microsoft.com/en-us/library/ee890118.aspx
5http://blogs.technet.com/speschka/
6http://msdn.microsoft.com/en-us/sharepoint/ff660758.aspx
7http://msdn.microsoft.com/en-us/library/ff408262.aspx
8http://msdn.microsoft.com/en-us/library/ff699494.aspx
9http://msdn.microsoft.com/en-us/library/ff953202.aspx
10http://msdn.microsoft.com/en-us/library/gg552609.aspx
11http://msdn.microsoft.com/en-us/library/gg481769.aspx
12http://msdn.microsoft.com/en-us/library/gg251994.aspx
13http://msdn.microsoft.com/en-us/library/gg252020.aspx
14http://msdn.microsoft.com/en-us/library/gg317440.aspx
15http://msdn.microsoft.com/en-us/library/ee535894.aspx
16http://msdn.microsoft.com/en-us/library/microsoft.sharepoint.administration.claims.aspx
17http://msdn.microsoft.com/en-us/library/ee658259.aspx
18http://technet.microsoft.com/en-us/sharepoint/ff678022.aspx
19http://msdn.microsoft.com/en-us/sharepoint/ff420377.aspx
20http://msdn.microsoft.com/sharepoint/default.aspx
Community Content
Problem seeing users in People Picker
I followed instructions carefully, just replaced few names
to make them distinct. My MockSTS is registered without errors but the
STS does not show up in the People Picker in the left pane with groups. I
can see "All Users (MockSTS)" under the "All Users" group but I
cannot find or validate any of the hardcoded users (user1@wingtip.com). What is wrong with my set up?
On the previously posted issues, I confirm, if you change the platform to 64 bit when compiling RegisterSTS, error "Farm is unavailable" disappears when trying to get access to the Local farm.
On the previously posted issues, I confirm, if you change the platform to 64 bit when compiling RegisterSTS, error "Farm is unavailable" disappears when trying to get access to the Local farm.
- 4/9/2012
- Spider
The Local Farm is not Accessible - another resolution
I also got stuck on the line
"SPSecurityTokenServiceManager.Local". I was receiving the message "The
Local Farm is not Accessible".
I took a look at the code for SPSecurityTokenServiceManager.Local, and it calls SPFarm.Local. I tried to re-implement this method and call SPFarm.Open(ConnectionString), with the connection string to the SharePoint Config Database. At this point, I received the message "Retrieving the COM class factory for component with CLSID {BDEADF26-C265-11D0-BCED-00A0C90AB50F} failed due to the following error: 80040154."
Referencing https://msmvps.com/blogs/officept/archive/2011/07/25/clsid-bdeadf26-c265-11d0-bced-00a0c90ab50f-failed-due-to-the-following-error-80040154.aspx, I switched the project from 32-bit to 64-bit, and recompiled the application. At that point, the code ran successfully.
I thought I'd pass this along, as it took me several hours to get past this issue.
- 3/30/2012
- Mark Heimonen
Farm is not accessible. - fixed
Thanks for this article!!!!
CarlosMit,
I had the same issue.
I was able to fix it by following instructions found in a post on Darrin Bishop's blog.
http://darrinbishop.com/blog/2010/05/the-local-farm-is-not-accessible-cmdlets-with-featuredependencyid-are-not-registered
Before I fixed it, I attempted to go the Powershell as mentinoned in the Walkthrough but when I opened powershell, I
received the same "local farm is not accessible". this led me to Darrin's blog.
It is a rights issue. Another person at my company did not get the "local fram is not accessible" when they opened powershell.
This person ran the powershell command with my username as described in the blog post.
I did not get the "local farm is not accessible" message anymore in powershell or in the code in the walkthrough.
Thanks for your blog Darrin!!
Jesse
Creating Trusted Login Providers
Thanks for this article
I am facing problem with IIS configuration
I configure the trusted identity provider successfully and am getting login page and redirect to sharepoint site after authentication this works only with the "Local" when we open the site in other than the local we are getting error like website cannot find.
Thanks in Advance
- 2/4/2012
- Praveen Manne
Cannot register provider.
Thanks for this article. Very Help full, I how ever have 1
issue that I am struckling to resolve.
I get “The farm is
unavailable.” On the following line of code: SPSecurityTokenServiceManager manager = SPSecurityTokenServiceManager.Local;
I searched on Google and tried everything they said, but
nothing seems to work. I am running as system administrator and have full
permissions on all the databases.
Any ideas would be appreciated.
- 1/3/2012
- carlosmit
Please Share what changes have to be made...
I am curious as to what code is missing in point 8 under
step 3. I was able to make it work even without that. My only issue was
that in the DefaultRealm , I was not including _trust. Once I did it, it
is working fine....
If any one needs any help let me know...contact me via : http://sharepoint14hive.blogspot.com/
If any one needs any help let me know...contact me via : http://sharepoint14hive.blogspot.com/
- 3/7/2011
- Kartik Anand, MCPD, MCITP
The download code provided in the article is not working
This is to help people who are trying to use this article.
There is a download code provided at the start but it is missing code
at point 8 under step 3. We spent around 15 days on this. But now its
working finally............ I hope somebody else will be benefited.
- 2/28/2011
- VishalJadhao
Not able to add user4 after registering provider once
I have created custom login provider as mentioned in
walkthrough. This walkthrough has three users (user1, user2 and user3).
Also I have set up sharepoint site. Here (sharepoint site) I can see
three users in people picker. But now I want more users. I don't want to
add more users from sharepoint's People & Group.
Please help!
Please help!
- 11/16/2010
- AnilNagthane
How to add more users
Please can you help me out to add more users after registering trusted login provider?
- 11/16/2010
- AnilNagthane
© 2012 Microsoft. All rights reserved.
Subscribe to:
Posts (Atom)
Reply #17 on : Fri May 04, 2012, 01:33:18